
Are you suffering from low back pain and are looking for low back stretches?
You have come to the right place!
To watch Dr. McCoy explain our McKenzie Protocol, watch:

Excerpts from Dr. Karin Drummond's Book: Combat Low Back Pain
STRETCHES AND EXERCISES FOR low back pain
MOST LOW BACK PAIN involves tight low back muscles, weak abdominal muscles, weak muscles between the shoulder blades, and tight pectoral (chest) muscles. Such imbalances in the muscles make it difficult to hold a healthy posture. The next few chapters show you how to stretch tight muscles and strengthen weak muscles. Doing these stretches and exercises should help alleviate low back pain and pain that radiates down the legs because these symptoms are usually a result of poor posture, poor work ergonomics, injury, and/or degeneration over time. |
Most of these stretches are in my Top Seven Ways to Combat the Effects of Sitting book. If you not interested in reading about the stretches or exercises at this moment, skip to Chapter 14 to learn about more ways to treat low back pain.
If you have not read my sitting book, then you should know that it is important to stretch something every twenty minutes. Even a simple stretch such as a knee hug or a seated spinal twist helps to break the cycle of tension and pain. The frequency of your stretching is more important than the duration and intensity.
If you do one or two stretches every twenty minutes, it is possible to do most stretches in this book every day. If you find this frequency difficult at first, pick the top three stretches that can be done while lying down that help your back and do them first thing in the morning before you get out of bed; then do them again after you get in bed to go to sleep. Pick the top three seated stretches that seem to help your back the most and do them as often as you can while you are seated at a computer or watching television. Pick the top three standing stretches that help your back and try to do them at least every hour. Hopefully, as you feel better, you will be encouraged to increase the frequency of your stretches as well as to add even more stretches.
Unless otherwise noted, you can do the stretches in this chapter either sitting or standing. If you sit at a desk all day, I encourage you to stand up when stretching.
As always, confirm with your health provider that these stretches are safe and appropriate for you.
You don't have to be in pain. Why wait?
Seated Spinal Twist For Low Back Pain

Figure 5‑1
To stretch your whole spine in rotation, cross your right leg over your left. Place your left hand across your right knee, and put your right hand behind your chair. Pull with your hands to twist your torso so you can look behind you. Extend the stretch by directing your eyes even further into the twist. (The muscles in your eyes need to stretch too!) Hold the stretch as you breathe in, and deepen the stretch as you breathe out. Repeat on the other side.
This not only stretches your low back and hip muscles, but it also “wrings out” your abdominal area, which helps the flow of bowel movements and abdominal lymph fluid, which is imperative for good health.
Latissimus Dorsi Exercise For Low Back Pain
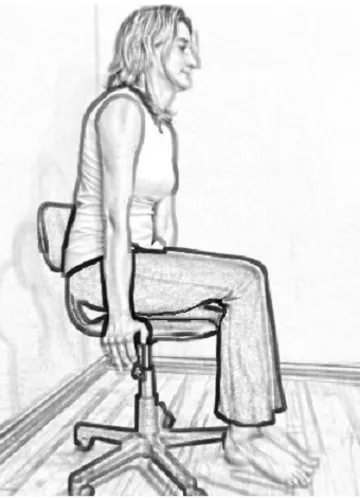
Figure 5‑2
Grip the arms (or seat) of your office chair with your hands and lift your buttocks off the chair. This strengthens the muscles of the lateral side body (latissimus dorsi muscle). The exercise also takes weight off your lower back. You should feel traction in your low back (creating space between your lumbar vertebrae). Do not slouch while stretching these muscles.
Hold this position as long as comfortable. Be mindful of your wrists (don’t hurt your hands trying to strengthen your back).
Hamstring Stretch For Low Back Pain
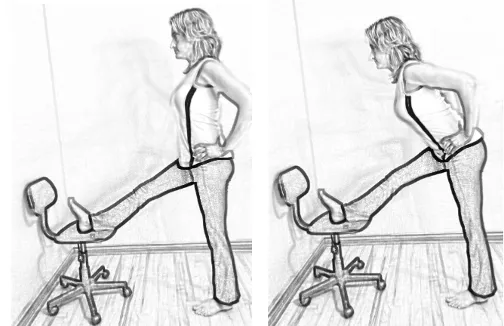
Figure 5-3
To stretch your hamstrings (the muscles in the back of your thighs), stand up and then place one foot on a stool or table (preferably without wheels). Keeping your back straight, bend forward at your waist until you feel the stretch. To increase the hamstring stretch, tilt your pelvis (sticking your buttock out). To deepen the stretch even further, bend forward even more.
The goal here is to stretch your hamstrings, not to bring your nose to your toes or anything dramatic, so do not arch your back to reach farther. It may look more impressive to stretch farther, but over-stretching strains your back. If you feel a stretch in your hamstring, you are effectively stretching it. Reaching farther by arching your back is not going to help your hamstring and may harm your back.
If your hamstrings are already flexible and you want to add to the stretch, you can add an isometric contraction of the hamstring by pressing your extended leg down onto the stool or table while doing the stretch as described above. Hold the contraction for five breaths, and then relax. After a bit of relaxation, see if your torso hinges forward easily as your hamstring relaxes and elongates. If so, allow your torso to go into that space. Then repeat with the press, hold, and relax up to three times.
To see a demonstration of this, visit my YouTube channel. The link to this stretch is http://youtu.be/YakhfpazqFs
Knee Hugs For Low Back Pain
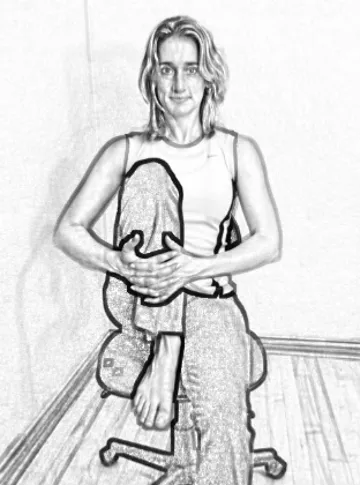
Figure 5-4
To stretch your lower back and anterior (front) thigh, lift your right knee and hug it to your chest as you breathe out. Breathe in as you release your right foot back down to the floor.
Now take your left knee and hug it to your chest as you breathe out. Breathe in as you release your left foot back down to the floor.
Repeat three times, alternating the right and left legs
This stretch can also be done lying down.
You don't have to be in pain. Why wait?
Pelvic Tilts For Low Back Pain
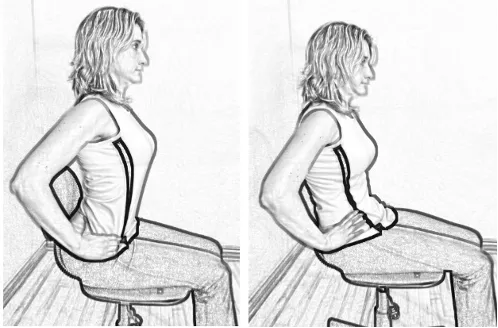
Figure 5‑5: pelvic tilts for low back pain
If you typically sit in your chair all the way back against the chair back, sit (lean) forward on your chair a bit. Tilt your pelvis forward by sticking your tailbone out and arching your lower spine in extension. Then tuck your tailbone in, which tilts your pelvis backward, stretching your lower spine in flexion. Repeat this rocking motion ten times. This exercise acts like a pump for the disks in your spine and rehydrates them, combating the effects of sitting still, which slowly compresses them over time.
In addition to rocking your pelvis forward and backward, you can rock your pelvis left and right by leaning to the right and hiking your right hip up toward your right shoulder and then leaning to the left, hiking your left hip to your left shoulder. This is an easy way to sneak in movement throughout the day. I demonstrate this stretch on my YouTube channel.
Cow Face Pose For Low Back Pain
Another stretch that is easily done throughout the day is the cow face pose. As you reach for your hands behind your back in this stretch, you will improve your posture and the flexibility of the mid-back.
Reach your left hand up and over your left shoulder while reaching your right hand behind your back from below. Try to grab your right hand with your left hand. Hold your position for a few breaths and then switch your arm positions.
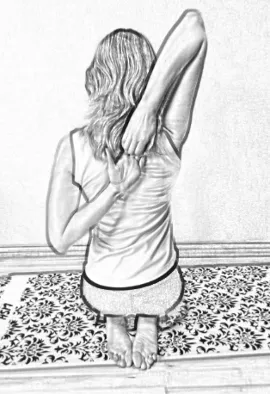
Figure 5-6: Cow face pose.
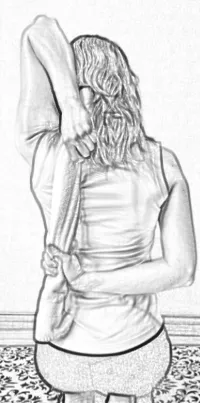
Figure 5‑7: Modified cow face pose with strap.
If you can’t reach your fingers, modify the stretch using a towel or strap. If you use a strap, be careful that you don’t overstretch. Listen to the limitations of your body.
If you feel a strain, you are overexerting your muscles; ignoring the strain will hinder your progress. Muscles elongate slowly over time; if you push them too hard, you may cause micro-tears. These micro-tears make your muscles vulnerable to further injury. Multiple micro-tears can lead to a major tear.
The same goes for your joints. If you feel pain in your joints, you are likely spraining them (either hyperextending your shoulders or hyperflexing your elbows). It’s not safe to stretch to the point of pain. You want to relax into the stretch, allowing your joints to soften, not break.
You can watch my YouTube video for a more detailed explanation of how to go from a modified cow face pose to the full pose:
https://www.youtube.com/channel/UC0dGeIPJ00LOLFIiXHAst8Q
You don't have to be in pain. Why wait?
STANDING STRETCHES FOR LOW BACK PAIN
THE FOLLOWING STRETCHES are relatively easy ways to loosen the back and leg muscles, which can cause pain in the low back. |
You may not think that the muscles in your thighs and lower legs would have much effect on your back, but they do. Thigh muscles affect the back by affecting the pelvis, which affects the tailbone, the bone the low back sits on. If the tailbone is tilted, it is no longer a neutral platform for the low back. This tilt sprains the discs and strains the muscles that anchor onto the low back and can lead to low back pain.
The calf muscles affect the knees, and if the knees are pulled out of a neutral position, this affects the position of the thighbone. If the thighbone’s position is off, this causes the pelvis to tilt. Again, a tilted pelvis tilts the tailbone, and a tilted tailbone is a physical stressor to the low back.
Even feet issues can affect the low back. More on this in Chapter 19.
Quad Stretch For Low Back Pain
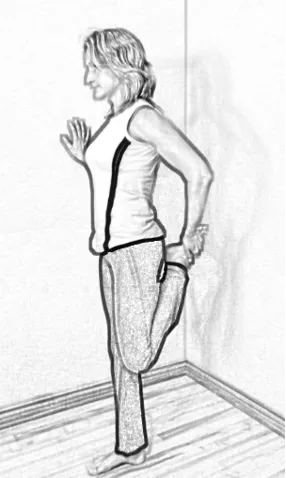
If you have low back pain and tight quads, stretching the quads should help your low back pain. To stretch tight quads, stand near a wall. Steady yourself with your right hand on the wall, then lift your left foot and grab it with your left hand. If you find it difficult to reach your ankle, you can use a strap around your ankle to extend your reach.
Pull your left ankle toward your buttock and hold for three breaths. Turn, and repeat on the other side. Do three sets of this stretch.
TFL Stretch For Low Back Pain
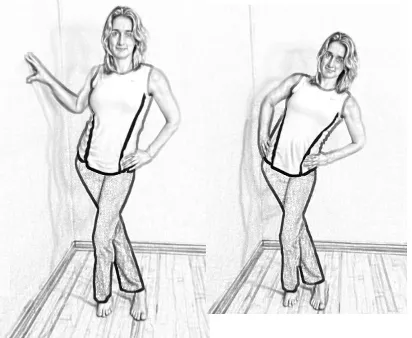
Figure 6-2: TFL stretch for low back pain relief
To stretch the muscles on the outside of your legs (specifically the tensor fascia lata muscle and the iliotibial band that run from the hip to the knee), stand within an arm’s distance of a wall. Steady yourself by placing your right hand on the wall.
Cross your left leg in front of your right leg so your feet are 12 inches apart and parallel to one another. If you find this difficult, stand with your feet hip width apart. Then stick your right hip out to the right while keeping your pelvis and spine straight.
You should feel a stretch in the lateral aspect of your right leg (close to your hip region). If you don’t, make sure you haven’t twisted your pelvis during the stretch. Try sticking your hip more to the right and move your pelvis around until you feel the stretch in the right lateral hip region. Hold the stretch for three slow breaths. With each exhale, you may be able to deepen the stretch. It is more important to hold this stretch than to repeat it, as you should be able to go further into the stretch with each exhale. When you have reached your maximum stretch, switch to the other side.
Lunges For Low Back Pain relief
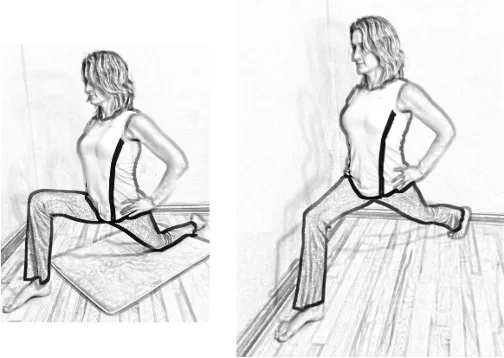
Figure 6-3
Sitting for extended periods tightens your hip flexors (the iliopsoas muscles). To stretch those muscles, get up out of your chair, stand up straight, and then step back with your left leg, bringing your knee to the floor. (You might want to put a mat or pad on the floor to provide a cushion for your knee).
Make sure your right knee does not go past your right foot as you lower into the lunge.
If you are stable, straighten your left leg (your back leg), and keep your right (front) knee bent as close to a 90-degree angle as possible. Keep your back straight and your pelvis pointing straight ahead. Don’t let your right knee go past the front of the right foot. You should feel a stretch in your left groin. If you do not, try moving your pelvis in different positions until you feel a stretch in your left groin.
Hold the stretch for five breaths, and then switch to the other side, extending your right leg backward and bending at your left knee. Do a total of three lunges on each side.
You don't have to be in pain. Why wait?
Standing Spinal Twists For Low Back Pain Relief
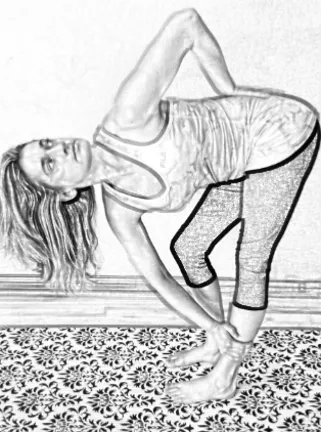
Figure 6-4
The standing spiral twist works your back and leg muscles at once. Start by bending forward at your waist. Lift your torso slightly and place your left hand on your low back (to make sure it stays in its neutral position). Reach your right hand to your left ankle.
If you cannot reach your left ankle with your right hand, try reaching for your left knee instead and bend your right knee.
You can keep the right knee bent. It is more important for your torso to twist than for your legs to remain straight.
Hold this position for a few breaths, then repeat on the other side. It is more important to hold this stretch than to repeat it, as you should be able to go further into the stretch with each exhale.
If you have the flexibility, try twisting while keeping your knees straight (Figure 6-5).

Figure 6-5: Modified standing spinal twist.
To deepen the twist, you can reach your left arm under your left leg and bring your right hand behind your back. Clasp your hands together (Figure 6-6). Hold this position for three to five breaths.
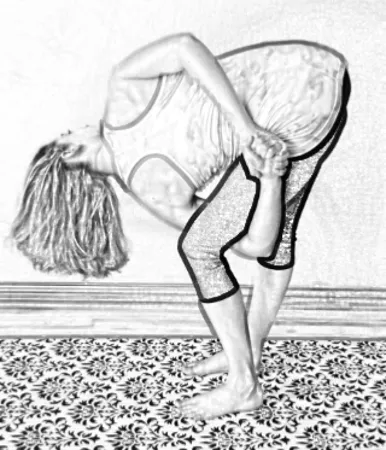
Figure 6-6: An extreme spinal twist.
As when doing any pose for the first time, ask a personal trainer or experienced yoga instructor to verify that you are performing the stretch or exercise correctly. You don’t want to strain a muscle or harm yourself while in the pose.
You don't have to be in pain. Why wait?
Forward Bends For Low Back Pain Relief
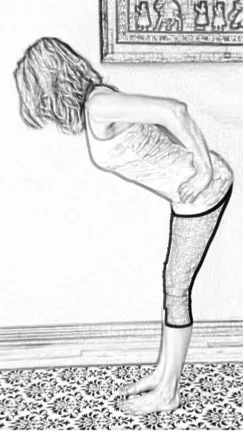
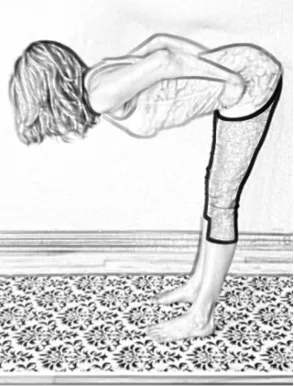
Figure 6-7: forward bends for low back pain relief
These forward bends stretch your hamstrings. Remember flexible hamstrings make for a happier low back. So, make sure you are feeling the stretch in your hamstrings and not your low back during this stretch.
Begin a forward bend by bending forward at the waist. Make sure you lead with your chest and not your head. If you strain to reach farther, you may harm your back versus stretching your muscles.
Keep your back in a neutral position as you hinge forward at the waist. You may not go as far as I am in Figure 6-7, but if you are feeling a stretch, you are improving the mobility of the muscles you are feeling the stretch in. As you hinge forward, pay attention to where you are feeling the stretch. If you are feeling a stretch in your hamstrings (the back of your thighs), then great! You are stretching your hamstrings!
If you are feeling a strain in your back, you are straining your back. Stop! Come back up and try again.
Aim to reach your hands to the mat (Figure 6-8), keeping your back as neutral as possible, to keep the stretch in your hamstrings.
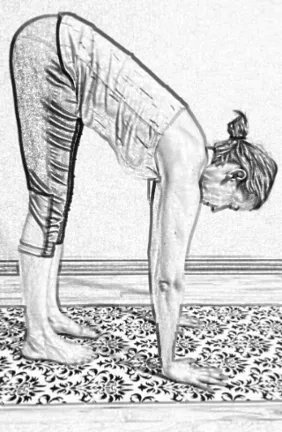
Figure 6-8: A forward bend with hands to the mat, keeping the back flat.
It may take months or even years before you can press your palms to the mat without arching your spine, but your range of motion will improve in the process. Maybe you can work toward getting your hands to the floor or your nose to your knees (Figure 6-9). Whatever your goal, as long as you improve or maintain over time, you are a success!
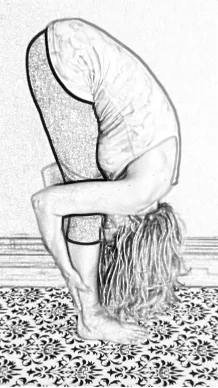
Figure 6-9: A full forward bend
In a full forward bend, the low back is stretched with the hamstrings. When you stretch the low back in s full forward bend, the weight of the upper body helps create space between the vertebrae of the low back. If you curve the low back too soon, the weight of the upper back is away from the center of gravity and can compress the front of the discs of the low back. This can injure those discs.

You don't have to be in pain. Why wait?
Calf Stretches For Low Back Pain Relief
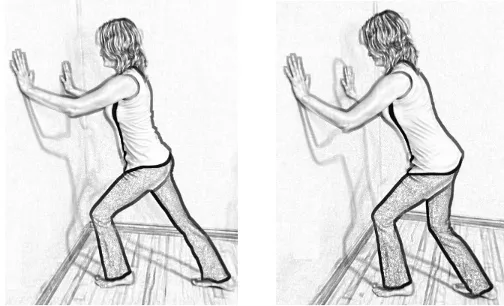
Figure 6-10
To stretch the calf muscles in the back of your lower leg, stand facing a wall and put your hands against the wall. Bring your right leg back and stretch your right heel toward the floor (this stretches the gastrocnemius muscle at the back of your calf, connected to the Achilles tendon). Hold for three breaths. Then bend your right knee to stretch the soleus muscle (the deeper muscle under the gastrocnemius). Hold for three breaths.
Repeat on the other side.
Remember, it is not the duration that matters, but the frequency that helps the most. I would rather you do this stretch once every hour versus ten times all at once. Doing this frequently helps break the cycle of chronic contraction of these muscles, which impairs blood flow and lymphatic drainage. That said, if you have time, do three sets of this stretch every hour.
STRETCHES for low back pain TO PERFORM WHILE LYING DOWN
AS MENTIONED in earlier chapters, a strong core and a flexible spine make for a healthy and happy low back. This chapter has examples of stretches for your core and spine that you can do while lying down. |
If you are struggling to find time to stretch, these stretches can be done in the comfort of your own bed before getting up in the morning and again in bed before you go to sleep.
Side Lying Stretch For Low Back Pain Relief
This stretch is a great way to stretch the muscles that run along the side of the body (the TFL, abdominal obliques, quadratus lumborum, lateral chest muscles, and more).

Figure 7‑1: Stretching the side body
The top side is the side that is stretched with this stretch. To stretch the right side, raise the right arm over your head, drop the right leg back and down, keep your right hip over your left hip (don’t allow your pelvis to tilt back), and reach your right foot to the ground. Hold for three breaths, deepening the stretch with each breath, and then switch to the other side.
Spine Extensions For Low Back Pain Relief
To work on the extension of your spine, lie on your stomach with your hands at your sides. Carefully lift your head off the mat so your nose is pointed at the floor (Figure 7-1).
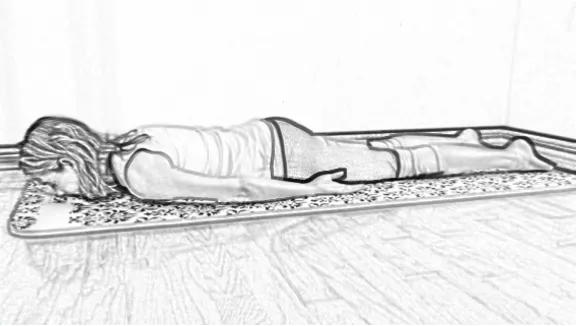
Figure 7-1: Lying prone (facedown) with the chin lifted off the mat.
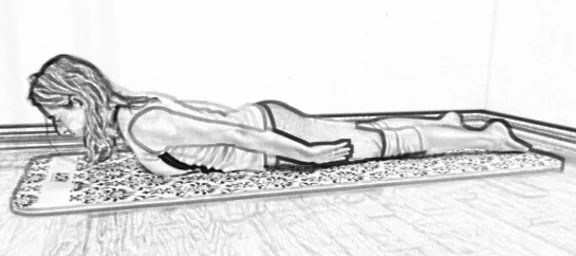
When you can do that comfortably, lift your head and chest off the mat (Figure 7-2). Contract your back muscles to lift your head and chest off the mat for an active back bend.
Then slowly lower your head, resting your head on the mat turned to the right as far as possible (Figure 7-3). If you can’t turn your head all the way to the right, turn it as far as you comfortably can. After going through this routine a couple of times, your neck should loosen up. Your range of motion will improve a little bit with each repetition.

Figure 7-3: Strong stretch for the neck to the right.
Once your neck relaxes, bring your head back to center, and raise your head slightly again (Figure 7-4). If it feels like you are straining, back off. If not, lift it higher. You can place your arms in front of you to support your upper body if you want a more passive stretch for your low back.
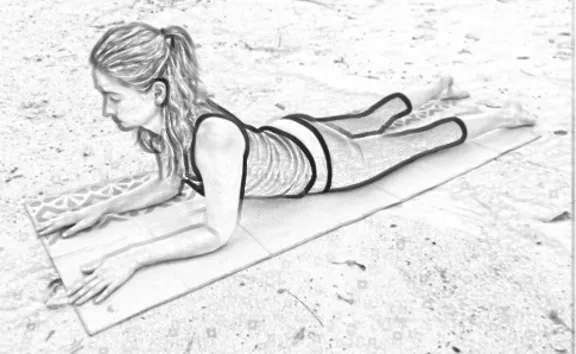
Figure 7-4: Passive back bend.
Then lower your head back onto the mat with your head turned to the left (Figure 7-5). Relax, allowing your muscles to elongate.
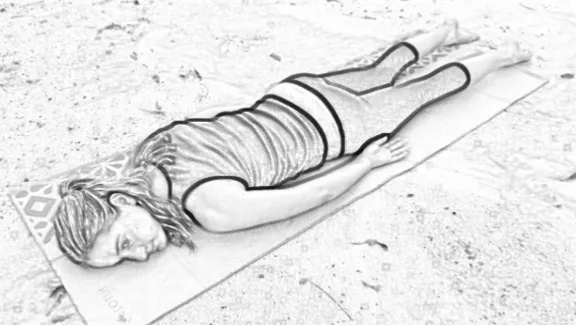
Figure 7-5: Strong stretch for the neck to the left.
Then bring your head to the center and repeat the series of moves. Go a little bit higher each time without straining yourself. Repeat three times.
You don't have to be in pain. Why wait?
When your neck does not feel any strain when you lift it off the mat, lift your hands as you raise your head (to strengthen your back muscles and work on your back extension; Figure 7-6).
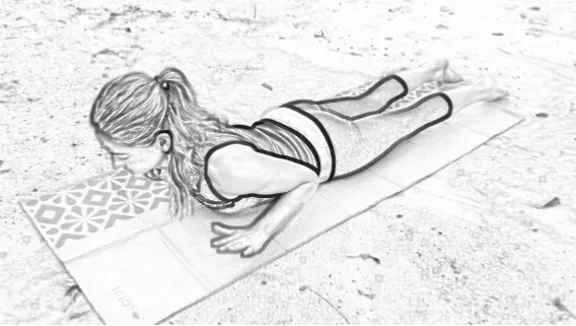
Figure 7-6: Active back bend to strengthen low back muscles for low back pain relief.
Again, move very slowly and concentrate on your breath (breathing in with lifting, breathing out with lowering) and form (keeping your shoulder blades down and engaged).
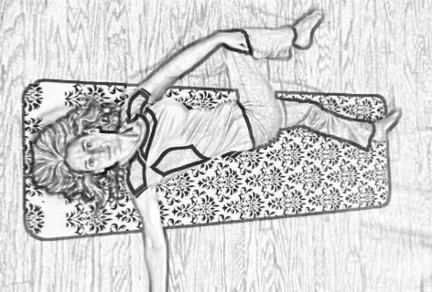
Supine Spinal Twists For Low Back Pain Relief
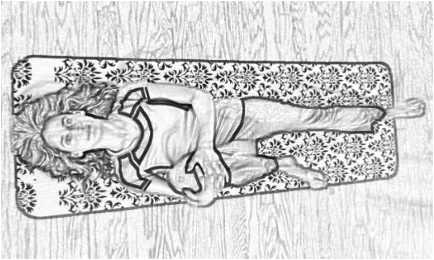
Figure 7-7: knee hugs for low back pain relief
To stretch your whole spine in rotation, lie down on your back and bend your right knee to your chest (Figure 7-7).
Warm up your glutes (buttock muscles) by bringing your right knee to your left shoulder (Figure 7-8).

Figure 7-8: stretch for low back pain relief
Then stretch your right hip. Bend your left leg with your foot resting on the mat. Then rest your right foot on your left knee. Stretch the right hip by pressing your right knee out with your right hand (Figure 7-9).
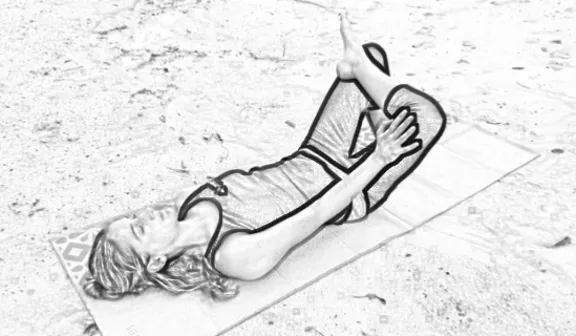
Figure 7-9: hip opening stretch
Now you’re ready to twist your spine. Lay your left leg flat on the mat. Bring your right knee across your left leg as close to the floor as you can without loosing the neutral curve of your spine (Figure 7-10).
Extend the stretch by turning your head to the right and reaching your right hand out with your arm perpendicular to your torso.
Hold the stretch as you breathe in, and deepen the stretch as you breathe out. Repeat with the left leg.
You don't have to be in pain. Why wait?
Deeper Spinal Twist For Low Back Pain Relief
To do a deeper spinal twist, cross your left leg over your right (Figure 7-11). Use your left leg to pull the bent right leg farther to the left as you look to the right.

Figure 7-11: deep spinal twist for low back pain relief
For an even more intense rotation, bring your right leg straight up and hold your right foot with your left hand (Figure 7-12).
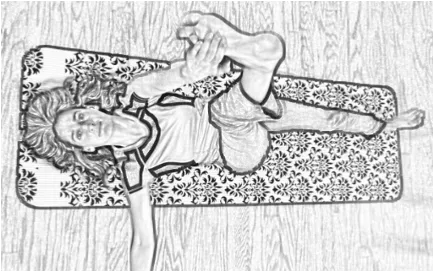
Figure 7-12: hamstring stretch for low back pain relief
Then bring your right leg to the left (Figure 7-13).
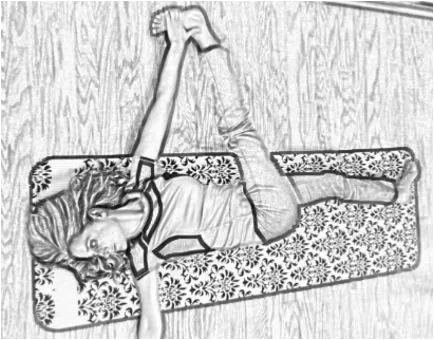
Figure 7-13 Deeper spinal twist for low back pain relief
Repeat this to the right to the level of your ability.
Hamstring Stretch
To stretch your hamstrings from a seated position, sit with your legs straight out in front of you. Then reaching for your toes (Figure 7-14). Hold the stretch for a few breaths and then relax. Repeat the stretch three to five times.
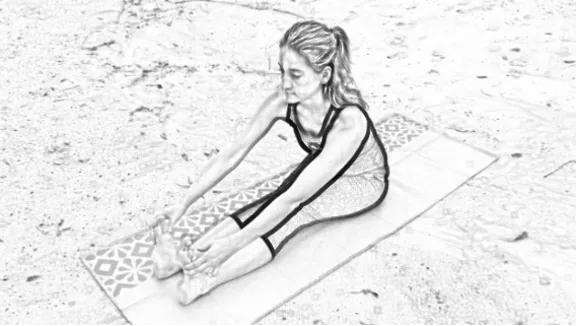
Figure 7-14: hamstring stretch for low back pain relief
Don’t worry if you can’t reach all the way to your toes when you start doing this stretch. Just keep trying, and in time you will see that you are getting closer and closer. Celebrate every increment!
You don't have to be in pain. Why wait?
Passive Back Bends For Low Back Pain Relief
Most people spend more time with their spines in a flexed state (slouched forward) than with their shoulders pulled back and their chest stretched. For these reasons, I always encourage my patients to work more on extension than flexion to combat strain on the low back and the negative health effects of slouching. For tight pectoral (chest) muscles, start with gentle passive back bends (Figure 7-15).
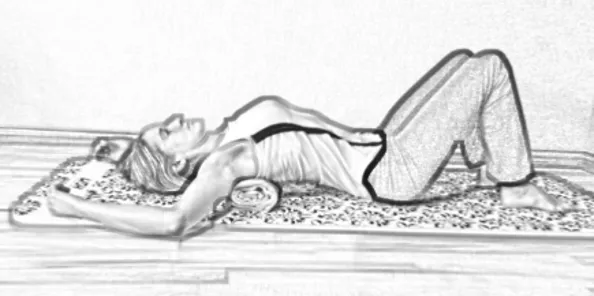
Figure 7-15: Passive back bend with a rolled-up towel.
Simply roll a bath towel into a tube and place it perpendicularly on the mat. Lie down so the towel is behind your back at the level of your shoulder blades. You can place your arms along your side, or for a deeper stretch, raise your arms above your head along the mat. This helps passively extend your back.
If you need a deeper stretch, use a foam roller instead of a rolled-up towel (Figure 7-16).
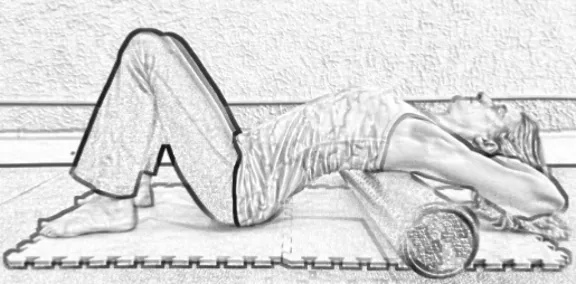
Figure 7-16: Strong passive back bend.
Lie in this position as long as is comfortable, but no longer than five minutes at one time. If you stay in this position too long, you may elongate your ligaments to a point that you may be vulnerable to moving your spine incorrectly, which could result in tweaking your back.
Extending your spine this way helps counteract reaching and/or slouching all day. If you don’t take the time to work on the extension of your mid-back, you will become more rigid in your forward bend, which strains muscles of your neck and low back over time.
Active Back Bends
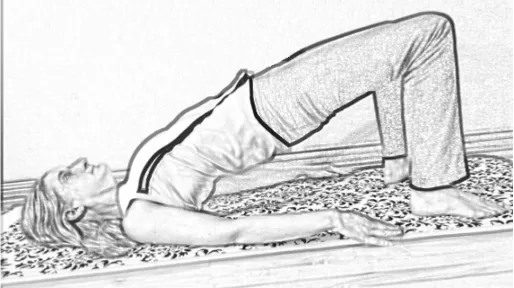
Figure 7-17: Bridge pose (an active back bend)
Another great way to combat low back pain from sitting and slouching are active back bends. An example of an active back bend is the bridge pose. Start by lying on your back with your knees bent. Place your feet hip width apart and your arms along your sides. Then lift your buttocks off the ground (Figure 7-17).
If that is too easy, try deepening the extension by lifting your pelvis with your hands on your buttocks as shown in Figure 7-18.
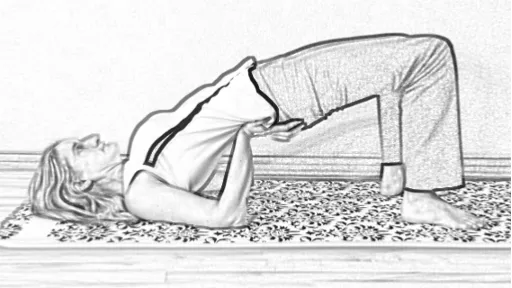
Figure 7-18: A deeper back bend for low back pain relief
If that is still too easy, try a modified camel pose as shown in Figure 7-19. You will have to get up off the floor (or bed) for this stretch.
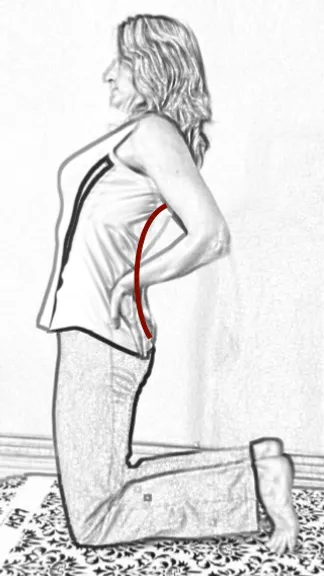
Figure 7-19: Modified camel pose for low back pain relief
Start in a kneeling position. Place your hands on top of your buttocks, fingers pointing toward the floor. If comfortable, curl your toes underneath (flexing your feet). Spread your toes. Lift your chest. Be sure the bend in your back is occurring between your shoulder blades and not your lower back. If you are bending more in the low back, this can compress the discs of the low back, which may result in injury. You want the bend to occur at the mid-back (as shown by the red line along the spine in Figure 7-19). Bending more in the mid-back is best for stretching your pectoral muscles and improving the flexibility of your mid-spine’s extension, making it easier to stand upright.
If that is easy, try a full camel pose as shown in Figure 7-20.
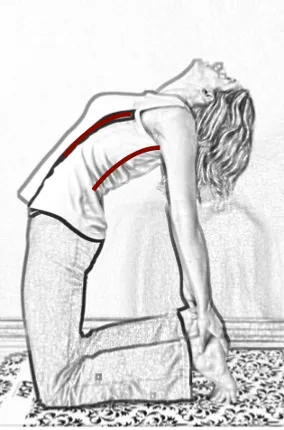
Figure 7-20: Camel pose for low back pain relief
After getting into the modified camel pose, reach back for your right heel with your right hand and then your left heel with your left hand. Press your pelvis forward and your chest up, and let your head fall back (if your neck is comfortable with this). If you have a neck injury, you may need to keep your head from tilting back.
Working Toward a Full Back Bend For Low Back Pain Relief
You will have to get up off the floor (or bed) for this stretch. You will also need an exercise ball.

Figure 7-21: Passive back bend over an exercise ball.
To use an exercise ball to do a passive back bend, simply sit on the floor, holding the ball behind you. Then move up the ball as it rolls under you until you are arching your back over the ball as far as you comfortably can (Figure 7-21).
As you become more flexible and get more comfortable moving on the ball, you can do a full back bend on the exercise ball.
You don't have to be in pain. Why wait?
This requires you to roll back on the ball and then reach your arms and hands over your head to brace yourself on the floor (Figure 7-22). This is a more comprehensive stretch in that it stretches your arm, back, thigh, calf, and feet muscles, not to mention your abs.
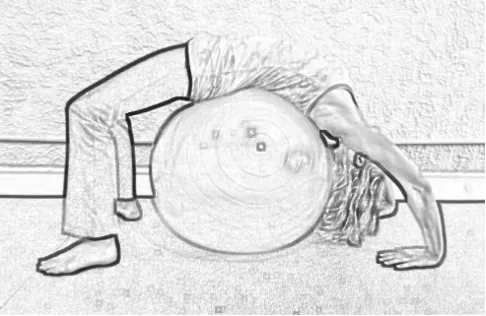
Figure 7-22: Back bend over an exercise ball.
Wheel Pose For Low Back Pain Relief
After you are comfortable doing back bends on the exercise ball, you can work toward doing the wheel pose, shown in Figure 7-23.
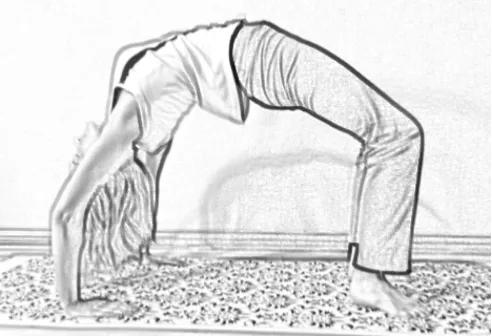
Figure 7‑23: Wheel pose for low back pain relief
If you have no experience with the wheel pose, see a yoga instructor for the best way to enter this pose. This pose is as hard as it looks, and if you don’t understand the proper way to get into and out of it, you could injure yourself. It’s best to master the other back bends in this chapter before attempting the wheel pose.
Again, you don't have to be in pain!
Why wait?
STRETCHING YOUR Low BACK MUSCLES WITH DOWNWARD DOG
DOWNWARD DOG is a popular yoga pose that stretches your back muscles as well as your leg and arm muscles. It starts off easy, as do most yoga poses, but it quickly gets harder. Don’t push yourself beyond your abilities when you first start with this pose. Gradually work up to the full pose. |
If you want to work toward doing a full handstand, the easiest way to start is by doing downward dog. After you’re comfortable in that pose, you can work on additional movements that will eventually have you standing on your hands.
To get into downward dog, start on your hands and knees with your hands under your shoulders and your knees under your hips (Figure 12-1). Curl your toes under, keeping your lower legs parallel and in line with your knees. The middle fingers should point forward, and your arms should be parallel to each other in line with your shoulders.
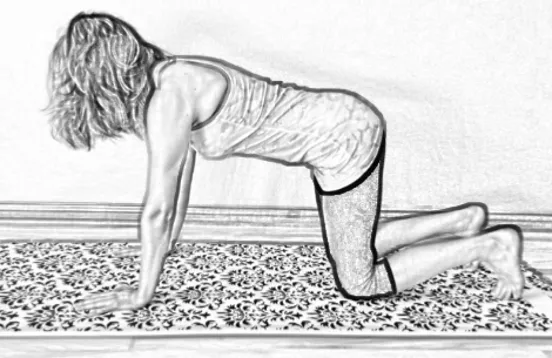
Figure 12-1: Start position for downward dog.
Do some angry cat and cow oscillations to find where your neutral spine is (Figures 12-2 and 12-3). Flex and extend your spine as far as you can. Your neutral spine should be somewhere between the cat and cow positions.
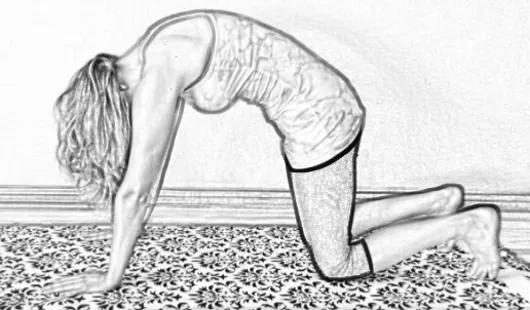
Figure 12-2: Angry cat pose.
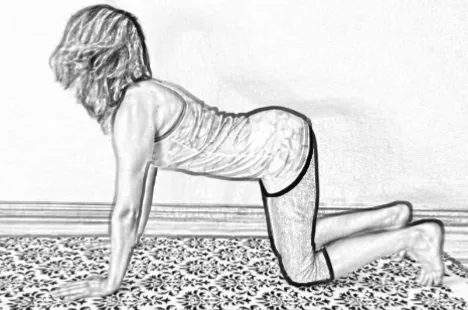
Figure 12-3: Cow pose.
Holding your neutral spine with your core muscles, push back with your arms and legs into downward dog (Figures 12-4 and 12-5).
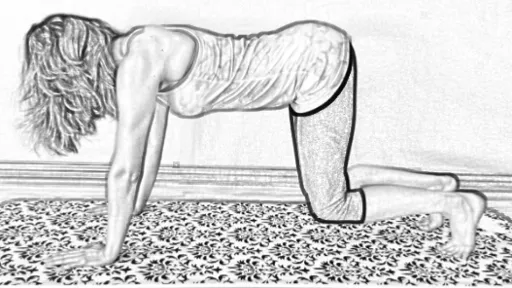
Figure 12-4: Pushing back into downward dog.
It’s more important to keep your neutral spine than to reach your heels to the floor:
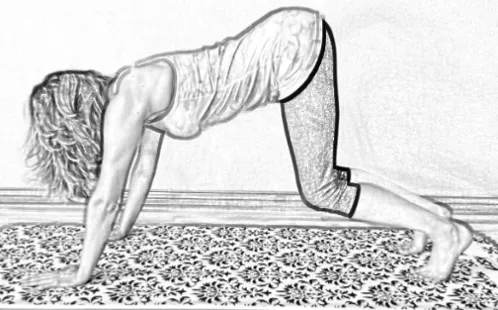
Figure 12-5: Going further into downward dog.
Warm up your legs by alternately bending your right and left legs (Figures 12-6 and 12-7).
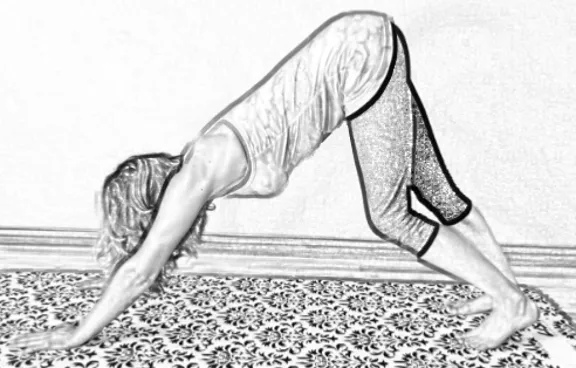
Figure 12-6: Reach your heels to the floor, but more important, keep the spine neutral (left leg).
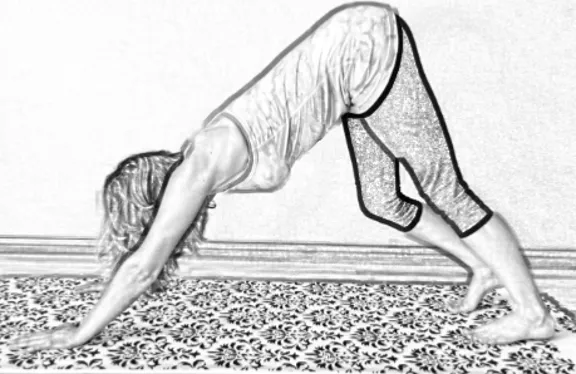
Figure 12-7: Reach your heels to the floor, but more important, keep the spine neutral (right leg).
Again, the goal isn’t to reach your heels to the floor, but to keep your spine neutral.
Feel free to keep your knees bent (Figure 12-8).
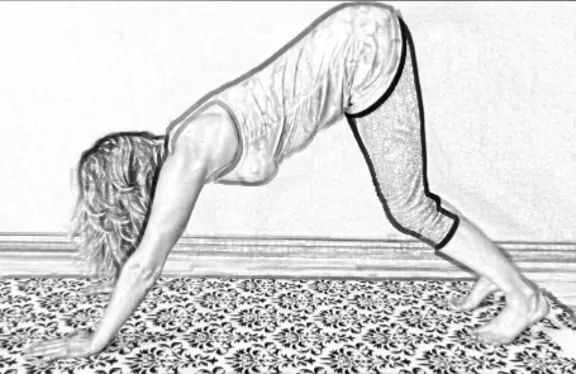
Figure 12-8: Downward dog with knees slightly bent.
Eventually (be it minutes, days, months, or years), you may be able to get into full downward dog (Figure 12-9).
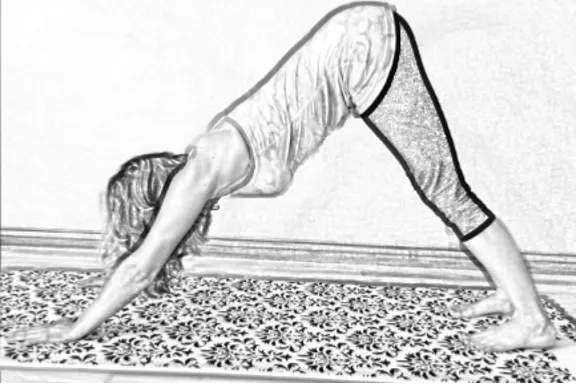
Figure 12-9: Downward dog for low back pain relief
When downward dog is comfortable and you are strong enough to do full push-ups, you are ready to try the steps toward getting into a handstand.
To learn more about how we treat here at Drummond Chiropractic, CLICK HERE.
To go back to our home page, CLICK HERE.
You don't have to be in pain. Why wait?