
Are you suffering from low back pain and are looking for low back exercises?
You have come to the right place!

Excerpts from Dr. Karin Drummond's Book: Combat Low Back Pain
STRETCHES AND EXERCISES FOR low back pain
MOST LOW BACK PAIN involves tight low back muscles, weak abdominal muscles, weak muscles between the shoulder blades, and tight pectoral (chest) muscles. Such imbalances in the muscles make it difficult to hold a healthy posture. The next few chapters show you how to stretch tight muscles and strengthen weak muscles. Doing these stretches and exercises should help alleviate low back pain and pain that radiates down the legs because these symptoms are usually a result of poor posture, poor work ergonomics, injury, and/or degeneration over time. |
Most of these stretches are in my Top Seven Ways to Combat the Effects of Sitting book.
Unless otherwise noted, you can do the stretches in this chapter either sitting or standing. If you sit at a desk all day, I encourage you to stand up when stretching.
As always, confirm with your health provider that these stretches are safe and appropriate for you.
You don't have to be in pain. Why wait?
BACK EXERCISES TO IMPROVE POSTURE & PREVENT low back pain EXACERBATIONS
IF YOU FIND IT DIFFICULT to maintain a healthy posture, that is a sign you need to work on both stretching the mid-spine in extension and strengthening your postural muscles. Stretching and strengthening these muscles will give you the flexibility and endurance to hold a healthy posture with more ease. Poor posture strains the low back, making it vulnerable to an exacerbation of pain. A strong and flexible body makes it easier to hold a better posture, making it less vulnerable to injury. |
Rhomboid Strengthening Exercise For Low Back Pain Relief
Rhomboids are the muscles between your shoulder blades. Strong rhomboids are imperative for maintaining a healthy posture. You can strengthen them by simply squeezing your shoulder blades back and down as if you’re bringing the bottom of your shoulder blades together (Figure 8-1).
Hold this position for a couple of breaths. Remember to keep your shoulders back and down as you do this exercise. It is more important to do this exercise frequently throughout the day instead of focusing on the number of times you do it in a row. Try doing this stretch every twenty minutes.
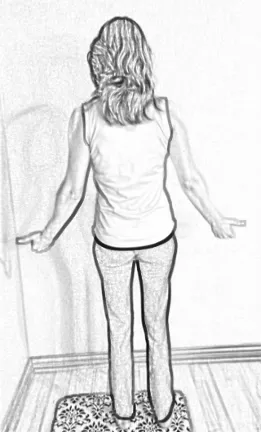
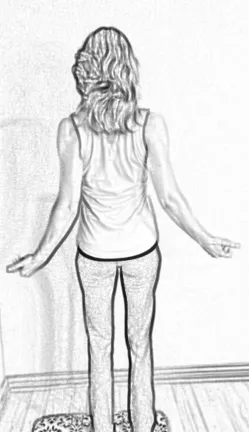
Figure 8-1: Strengthen the rhomboids by squeezing the shoulder blades back and down.
If your pectoral muscles in the front of your chest are tight or overdeveloped, they will pull your shoulders forward and cause you to slouch, which strains the low back. Doing this exercise will not only strengthen your opposing back muscles, but it will also stretch out your tight pectoral muscles and make it easier for you to stand up straight.
Be careful not to engage your upper back muscles (the trapezius muscles; Figure 8-2). They tend to be overdeveloped and want to assist your weaker rhomboid muscles.
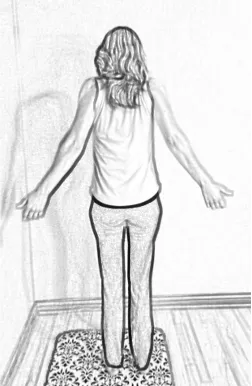
Figure 8‑2: Incorrect shoulder squeeze (top) versus proper shoulder squeeze below.

If you want to make this a heavy-duty workout, add the use of an exercise band (Figure 8-3).
Grip the band with both hands, palms up, and then slowly move your hands apart. Stretch your arms out straight and then slightly behind your back. You should feel a slight pull in the muscles between your shoulder blades.
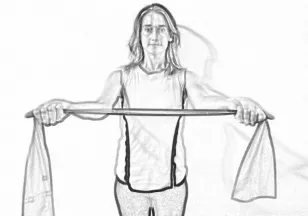
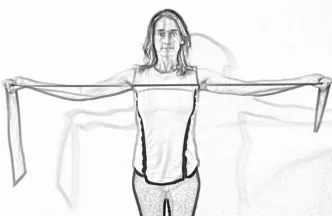
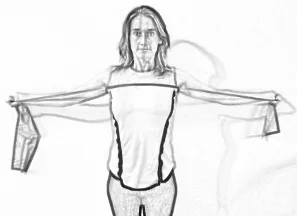
Figure 8‑3: Rhomboid strengthening with an exercise band.
I recommend doing this exercise with your palms up because it helps the shoulder blades maintain a better position. It also changes the orientation of your palms, which are usually facedown with regular daily activities. Remember, if you do too much of one thing, you should balance it out with the opposite action every once in a while.
Rhomboid Pull to strengthen postural muscles
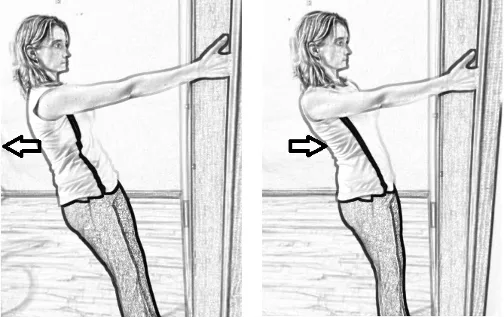
Figure 8‑4
If you don’t have an exercise band, grab onto a doorframe with one hand and lean back (keep your shoulders down, away from your ears). Then pull your weight up by squeezing your shoulders back and down by contracting your rhomboids (Figure 8-4). Be careful not to pull yourself up with your arm muscles—that’s cheating! Then relax, allowing your body to lean back. Repeat ten times.
Repeat on the opposite side.
Alternating Arm Flexion and Leg Extension to strengthen the low back muscles
You can also strengthen your back by lying on your stomach and raising one arm and the opposite leg without letting your pelvis move (Figure 8-5).
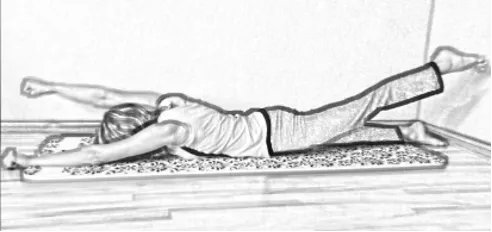
Figure 8‑5: Back strengthening exercise.
Lie on your stomach in a Superman position with your arms extended in front of you on the floor. Raise your right arm and left leg, hold the position, and then lower your limbs. Then raise your left arm and right leg. Make sure your pelvis does not tilt as you shift from lifting the left leg with right arm to lifting the right leg with left arm. If your pelvis rocks back and forth with the movement of your legs and arms, you are failing to engage and strengthen your core muscles. Work those abs to hold your torso tight!
Chapter 5: STRENGTHENING THE LOWER EXTREMITIES
IF YOU HAVE low back pain, further support of the spine is usually needed. You can achieve this by strengthening the lower leg and core muscles. The exercises in this chapter are offered with this in mind. |
Wall Squats
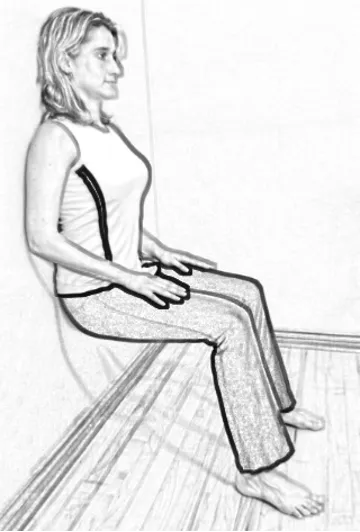
Figure 9‑1
To exercise your quadriceps muscles, stand with your back against a wall, walk your feet out farther than the length of your thighs, and squat by sliding your back down the wall (Figure 9-1). Protect your knees by not squatting too deeply; do not allow your knees to go past your feet. Hold this position for five breaths. This is a great way to strengthen the quads when you have low back pain because your back is supported by the wall. It is also a good exercise to repeat throughout the day for leg strengthening, making for a quick calorie burn.
Stronger Quad (Thigh) Strengthening For Low Back Pain Relief
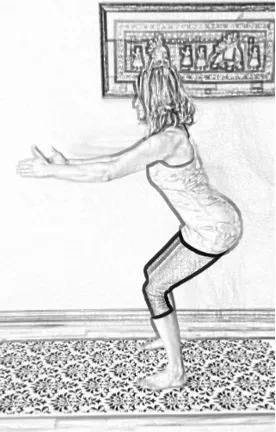
Figure 9‑2: Freestanding squats.
After you are able to do wall squats comfortably, try doing freestanding squats.
Stand with your feet shoulder width apart. Then extend your arms in front of you and move your buttocks back as if you’re going to sit in a chair (Figure 9-2). Make sure your knees don’t move forward in front of your feet because this can strain the knees
Work toward repeating a dozen times, and then repeat this several times throughout the day. You can do this exercise anywhere, and it doesn’t take long to do. Again, the frequency—not the intensity or duration—is what’s important to build strength and combat the effects of sitting too much.
After you’ve mastered freestanding squats, try going even lower with your squats (Figure 9-3).
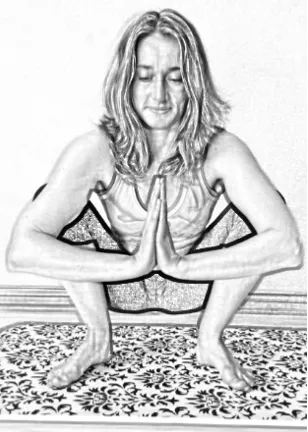
Figure 9‑3: Deep squats.
The deeper the squats, the more intense the workout, and the more you are working the abdomen.
For an even more intense quad workout, add a weight to your thighs while doing a wall squat (Figure 9-4).

Figure 9‑4: Adding a weight to wall squats.
The added weight places even more strain on your knees, so make sure you keep your knees behind your toes and over your heels.
Adductor (Inside Thigh) Strengthening
To work the inside thigh muscles, place a ball between your knees while you are doing a wall squat (Figure 9-5). Squeezing your knees against the ball will strengthen the adductor muscles.

Figure 9‑5: Squeeze a ball between your knees to strengthen your thigh muscles.
An alternative is to lie on your left side, bend your right knee, and place your right foot behind your left leg (Figure 9-6).
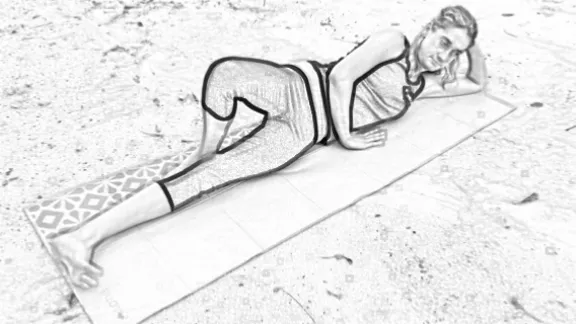
Figure 9‑6: The starting position for adductor muscle strengthening.
Support your head with your left hand. Stabilize yourself by placing your right hand on the ground. Keep your pelvis perpendicular to the ground and protect your low back by keeping your spine in line. Don’t allow your right hip to roll back or forward. Keep your right foot on the ground behind you. Flex your left foot so your toes lift toward your head.
Now you are in a position to work out your left adductor muscle. To do so, contract your inner left thigh by lifting your left foot away from the ground (Figure 9-7). If you feel your front or back thigh muscles engaging, you are not in the correct position.
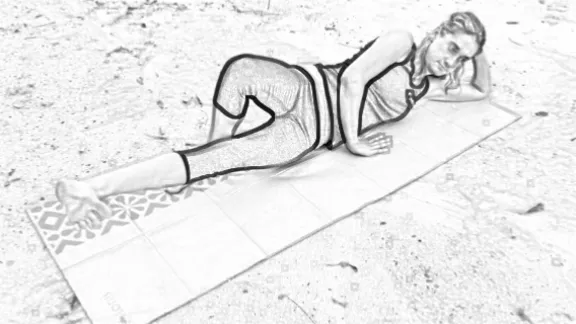
Figure 9‑7: Contracting the left adductor muscle to strengthen it and stabilize the pelvis.
Exercise your left thigh by repeating this exercise a few times, and then roll over and exercise your right thigh.
Strengthening the adductor muscles helps stabilize the hips and pelvis, making your back less vulnerable to injury.
TFL Strengthening for pelvic stabilizing
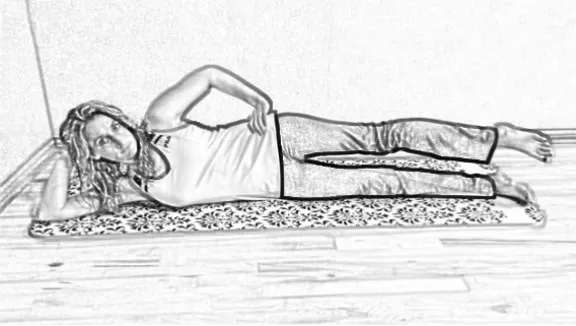
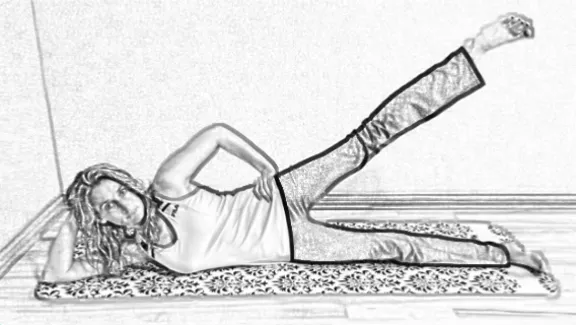
Figure 9‑8: Side leg raises to strengthen the TFL.
To exercise the muscles on the outside of your thighs, lie on your right side. Keep your hips perpendicular to the floor (one hip on top of the other). Raise your left hip. Keep your toes pointed toward your face as you lift your left leg. Pause at your farthest point for a breath or two (Figure 9-8). Then lower your left leg and pause for a breath or two just before it touches the right leg. Repeat three to ten times. Then repeat on the other side.
To increase resistance and make this exercise more difficult, put a mini loop exercise band just above your ankles (Figure 9-9). You can buy a set of mini loop exercise bands online for under $10.
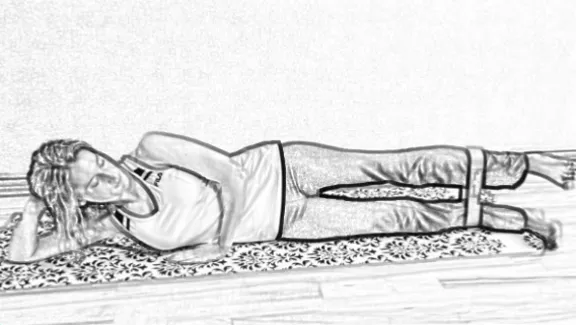
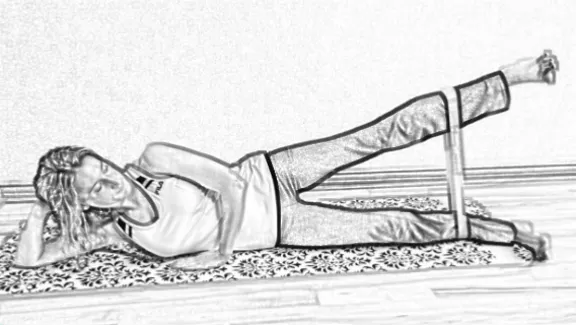
Figure 9‑9: Side leg raise with an exercise band.
Perform the same movements as described in the previous TFL exercise. The band will make it more intense.
You can also work out your TFL muscles using the mini loop exercise band while standing.
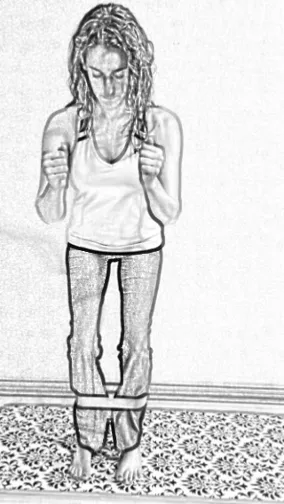
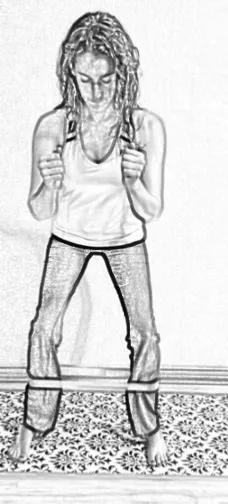
Figure 9‑10: Crab walk with an exercise band to strengthen the lateral leg muscles.
Place the mini loop exercise band above the ankles. Bend slightly at the waist; hold your arms, bent at the elbows, in front of your body; and keep your knees above the arches of your feet. If you let your knees go in front of your feet, you risk harming your knees.
Move your left leg sideways away from your right leg as far as you can and then plant your left foot on the mat (Figure 9-10). Move your right foot back to your left foot and repeat. You will slowly move to your left. Sometimes this exercise is referred to as the crab walk.
When you have moved as far as you want to go, reverse, and walk sideways back to your start position. Repeat three times.
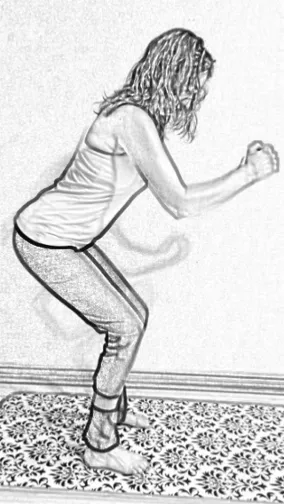
Figure 9‑11: Crab walk from the side view.
Again, note how the knees are over the arches of the feet while doing the crab walk (Figure 9-11). Keep your knees behind your toes because you don’t want to hurt your knees while trying to help your low back.
Combining TFL Strengthening with Core Strengthening For Low Back Pain Relief
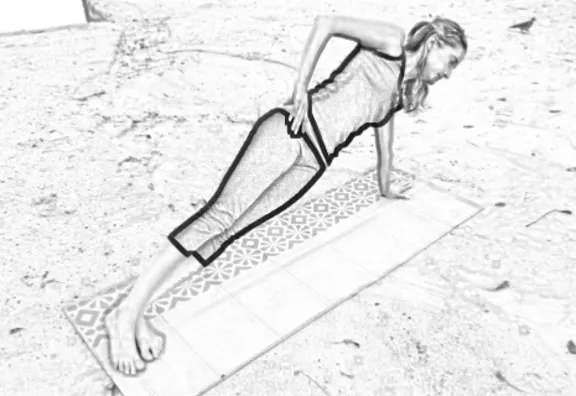
Figure 9‑12: A basic side plank for low back pain rleief.
A side plank (Figure 9-12) is a great way to strengthen the lateral thigh muscles and your core muscles at the same time.
Get into a side plank by starting in a plank position. Place your left hand under your nose, then turn to the right so the lateral aspect your left foot is on the ground and your right foot rests on top of your left foot. Make sure your left hand is placed under your shoulder, your left wrist is in a comfortable position, and your body alignment is straight (so your pelvic bones are on top of each other, not tilted forward or backward).
If this is too difficult, you can rest your left knee on the ground as in Figure 9-13.
An Easier Side Plank
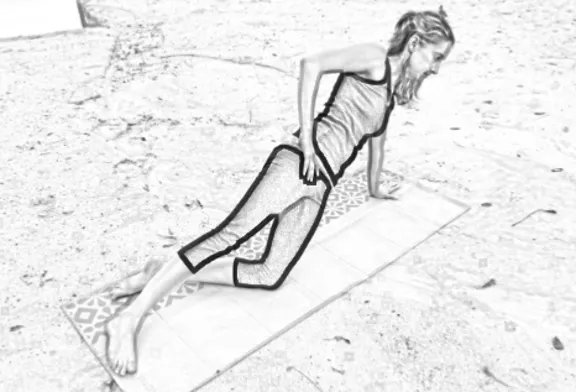
Figure 9‑13: Modified Side Plank.
If placing the weight of your upper body on your arm causes wrist pain, you can hold this position from your left forearm instead of your left wrist. Simply rest the side of your forearm from your elbow to your wrist and the side of your hand on the ground.
A Harder Side Plank For Low Back Pain Relief
To make this more intense for your TFL, raise your top leg. To really work your core at the same time, raise your top arm (Figure 9-14).
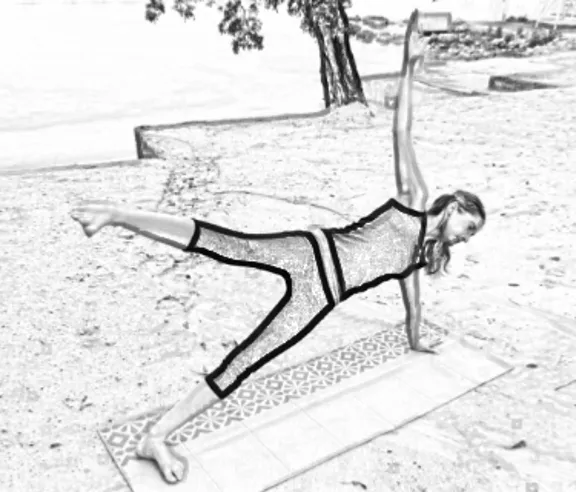
Figure 9‑14: An advanced side plank.
Hamstring Strengthening For Low Back Pain Relief
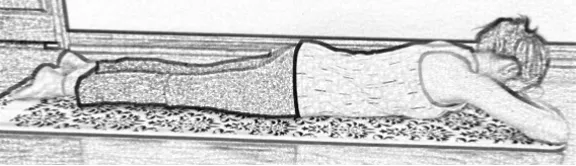
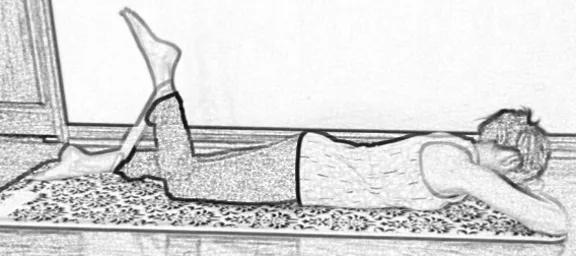
Figure 9‑15: Strengthening the hamstrings with mini loop bands.
To strengthen the muscles in the back of your thighs, put a mini loop exercise band around your ankles and lie on your stomach. Keep your left leg straight and on the ground as you bend your right knee (Figure 9-15). The resistance from the band will strengthen the right hamstring.
Do three to five right knee bends, and then repeat on the other side. Repeat three times as long as you feel no pain in the knee joint. You don’t want to sprain your knee while trying to strengthen your hamstrings.
CORE STRENGTHENING For Low Back Pain Relief
AN IMPORTANT ASPECT of good low back health and avoiding low back injury is having a strong core. |
The best way to strengthen your core muscles is by slowly contracting the abdominal muscles (otherwise known as doing crunches) with very little movement as you exhale. If you are doing crunches correctly, it won’t look like you are doing much because core muscles are stabilizers more than movers. But, when doing these exercises correctly, you may shake with the effort it takes to do them correctly. If you are moving a lot, you are likely doing the exercises incorrectly by engaging the muscles involved with movement (like the hip flexors).
I’ll outline the steps of my favorite core workout here, but you can also watch a demonstration of the workout online at https://youtu.be/5EAqQ4B7X0Y.
· First, lie on your back.

Figure 10‑1: Starting position for a crunch.
· Bring your hips, knees, and ankles to 90 degrees (Figure 10-1). To make it easier, keep your feet on the floor.
· Keep your knees and ankles apart. To make it harder, bring your knees closer together—but not touching— and make sure your ankles are spread farther apart than your knees.
· Put your hands behind your head. To make it easier, put your hands palm down on the floor with your arms along your sides or on your stomach so you can feel the muscles contracting (Figure 10-2).
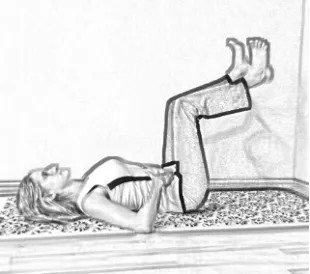
Figure 10‑2: Alternate starting position for a crunch: Keep your head down so you don't have to support your neck. That way, you can place your hands on your stomach to see if you are contracting the correct muscles.
· If your hands are supporting your head, keep your elbows bent back and wide, beyond your peripheral vision.
· Look up at the ceiling but keep your chin tucked toward your chest.
· Inhale.
· As you exhale, contract your stomach (rectus abdominis muscle), which should press your back to the floor and lift your pubic bone toward your chest (Figure 10-3). This is where most people make the mistake of moving too much. If your knees move a lot closer to your head, you are likely engaging the wrong muscles—your hip flexors instead of your abdominal muscles. Abdominal muscles are stabilizers, not movers.
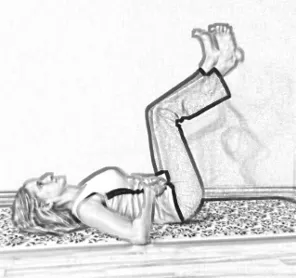
Figure 10‑3: Exhale and contract your lower abdominal muscles, causing your pubic bone to move toward your sternum and your pelvic bone to tilt, raising your buttocks slightly off the floor.
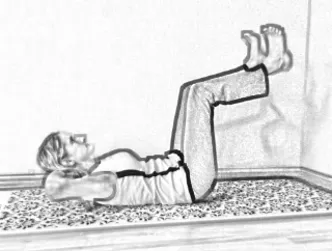
Figure 10‑4: In a full crunch, the upper and lower abdominal muscle fibers fire to lift the sternum and pubic bones toward each other.
· As you inhale, relax your stomach so you can expand your diaphragm (Figure 10-5). Don’t relax so much that your back arches off the ground. Your stomach should expand outward so your diaphragm has room to expand down, but your back should not arch.
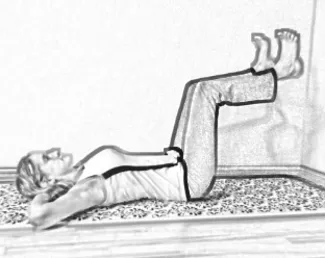
Figure 10‑5: Lower your head and expand your stomach as you inhale.
· Repeat the exhale/contract, inhale/relax cycle up to ten times, depending on your core strength.
Note: If you work your abdominal muscles too hard, they may not be able to contract completely the next day, making you vulnerable to blowing out your back. I have had too many patients report that a day or two after an intense workout (be it in the gym or their garden), they bent over to pick up a light object (like a pen) and blew out their back. This is because they weren’t expecting to have to purposely engage their core to protect their back for such a mundane movement. Because their core muscles were fatigued, the weight of their body leaning over with their arms extended was enough to sprain the discs in their low back. If you try this routine, limit yourself to a couple of repetitions at first and see how you feel the next day or two. If everything is okay, you can add more repetitions. Go slowly and give yourself the time it takes to strengthen your muscles.
After you’ve done some crunches, you can work to strengthen the muscles that run along the sides of your torso.
· To work out your abdominal oblique muscles (the muscles in the side wall of your stomach between your lower ribs and pelvic bone), breathe in and twist your torso slightly to the left, still lying on your back with your knees bent at 90 degrees with knees and ankles apart (Figure 10-6).
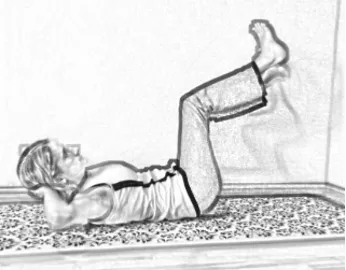
Figure 10‑6: Contract the right oblique muscle and bring the right pelvic bone and left chest toward each other.
· Exhale and contract your right abdominal oblique muscle (the right-side abdominal muscle). This should lift the right pelvic bone (the ilium) toward the left lower ribs. The left lower ribs, chest, and shoulder may rise off the floor. The goal is not to bring the left elbow to the right knee; the goal is to contract the correct muscle. The right oblique abdominal muscle is not connected to the left arm or right leg, so if either is moving, you are engaging the wrong muscles. Keep the left elbow away from the right knee and out of your peripheral vision.
· Repeat the exhale/contract, inhale/relax cycle up to ten times, depending on your core strength.
· Then switch sides. While inhaling, twist your legs (still bent at 90 degrees with knees and ankles apart) slightly to the right.
· Exhale and contract your left abdominal oblique muscle (the left-side abdominal muscle). This should lift the left pelvic bone (the ilium) toward the right lower ribs.
· Repeat the exhale/contract, inhale/relax cycle up to ten times, depending on your core strength.
· Now rest and put your feet on the floor, hip width apart.
· Bring your arms to your sides, palms down (if they aren’t there already), and tuck your shoulders slightly in and underneath you so you can lift your pelvis up into a bridge pose (see Chapter 6 for details on this pose).
· Hold for up to ten slow inhale-exhale cycles.
· Turn over onto your stomach and do up to ten push-ups, inhaling as you lower, and exhaling as you press up.
Note: If you cannot do a full push-up, do a plank from your knees. If planking is too easy, do push-ups from your knees; make sure your body stays flat like a board—do not arch or sag your spine or allow your buttocks to rise up or sag. If push-ups from your knees are too easy, press up from your knees, then raise your knees and lower into a full push-up position. Then lower your knees so you can press up from your knees again, and repeat. To see how to work toward being able to do push-ups, see Chapter 10.
· Finally, if you are able, go into some form of a handstand (see Chapter 13).
Note: If you cannot get into a handstand, lie on the floor with your buttocks up against a wall and place your legs against the wall for a passive inversion (Figure 10-7), which is better than no inversion at all. All day long our legs have to fight gravity to drain their lymphatic fluid (as discussed in Chapter 2). Inversions are a great way to assist in the drainage of this waste.
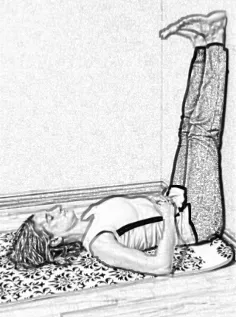
Figure 10‑7: Passive inversion against a wall as an alternative to the handstand.
· Repeat the whole routine, from beginning to end, up to five times.
This whole routine only takes ten minutes (or up to twenty minutes if you breathe slowly to hold the contractions longer, which makes for a more intense workout). If you do this series every day, you will tighten your abdominal muscles, which will help support your low back.
Strengthening Your Core Using an Exercise Ball
Start by doing a plank with your forearms on an exercise ball.
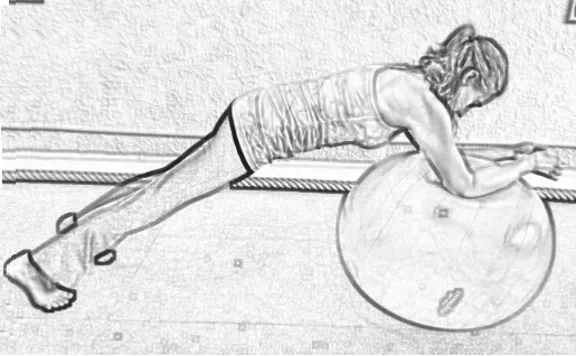
Figure 10‑8: improving core stability for low back stabilization
Then pull your elbows closer toward you.
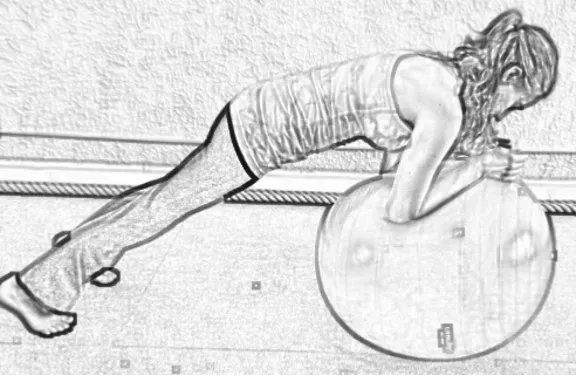
Figure 10‑9: Improving core stability for low back stabilization
Move your arms away from your body, rolling the ball back to its starting position.
Repeat this seesaw action several times. Do not let your stomach sag to the floor. This will hyperextend your low back and may result in injury. Keep your pelvic floor and abdominal muscles engaged during this exercise.
Pull-Ups and Chin-Ups
Another great way to work on your core, back, and arm muscles is to do pull-ups and chin-ups.
For these exercises, you need a bar to pull up on. You can get a pull-up bar that you place in a doorway. You can also find pull-up bars in most gyms and on some playgrounds.
To perform chin-ups, start by placing your hands on the bar, palms up (Figure 10-10). Engage the back muscles to stabilize the shoulders. Keep your shoulders away from your ears as you pull your chin up over the bar.
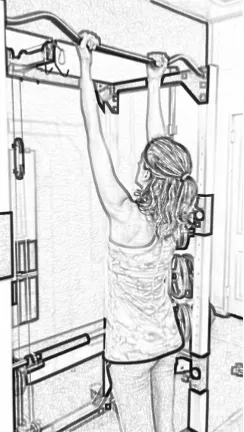

Figure 10‑10: Chin-ups
To make this easier, you can use a band to assist you, as shown in Figure 10-11. I have found pull-up resistance exercise bands for sale online from $7 to $22 that range from 15 pounds to 125 pounds of assistance. The more assistance, the thicker the band, the pricier the item.
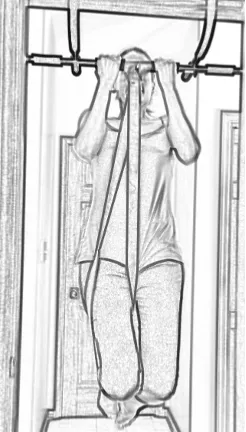
Figure 10‑11: Assisted chin-ups
For pull-ups, start with your hands on the bar, palms down and farther apart than for a chin-up.
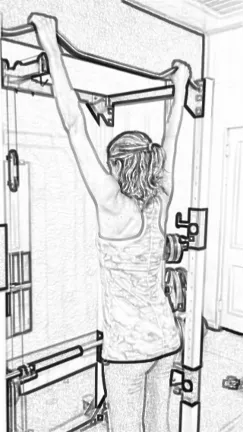
Figure 10‑12: Start of a pull-up
Engage the latissimus dorsi muscles (the muscles that run along the sides of your torso below your shoulder blades) to help keep your shoulders away from your ears as you lift your chin above the bar.
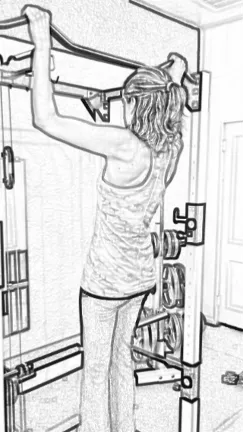
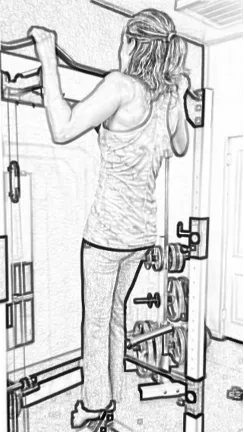
Figure 10‑13: Pull-ups
Again, you can use a band to assist you with this exercise.
PERFORMING PUSH-UPS
ANOTHER WAY TO STRENGTHEN your core muscles is by doing push-ups. I always advise hiring a personal trainer to watch how you perform specific exercises. A trainer can confirm you are doing them correctly. It is too easy to hyperextend your low back or twist your shoulders during a push-up and injure yourself. The last thing you want to do is hurt your low back while trying to strengthen the muscle that are supposed to support it! |
Step 1: Push-ups Against the Wall

Figure 11‑1
Stand at least an arm’s length away from a wall. Raise your hands in front of you to shoulder level, and rest them on the wall.

Figure 11‑2: wall push up to strengthen core to stabilize the low back
Bend your elbows, keeping your back straight so your nose approaches the wall. Get as close to the wall as you comfortably can with your forearms parallel and flat on the wall if you are able. Keep your neck in a neutral position with your chin slightly tucked in.
Then push away from the wall. Keep your spine neutral; do not slouch toward or away from the wall. This is a standing push-up. Repeat until you find it easy to hold the proper form.
When you can easily do more than twenty standing push-ups and are ready to make this exercise a bit more difficult, move your feet farther from the wall. When you are as far from the wall as you can be, move to Step 2.
Step 2: Push-ups from Your Knees

Figure 11‑3: push up from the knees to help strengthen the core muscles
From a hands-and-knees position, walk your hands forward and extend your body in a straight line from your knees to the crown of your head. Bend your elbows, keeping your back straight, so your nose approaches the floor. Lower your body slowly, as close to the floor as you can comfortably reach. Keep your forearms parallel and your neck in a neutral position with your chin slightly tucked in.
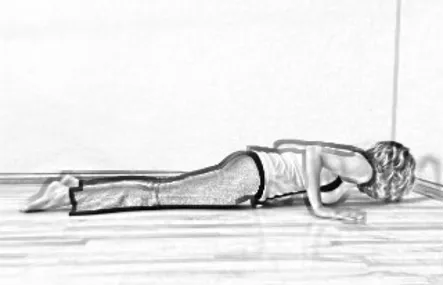
Figure 11‑4
Then straighten your arms and push yourself up again.
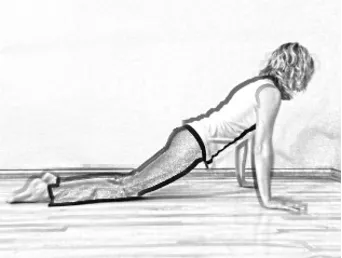
Figure 11‑5
Make sure you are not raising your buttocks high or arching your back so your buttocks dip low. Keep your spine as straight as possible. Repeat until you find it difficult to hold the proper position. If you can only do a few of these modified push-ups, finish your set with standing push-ups. Try doing small sets of modified push-ups throughout the day to slowly increase your strength over time. When you can easily do twenty modified push-ups in a row, you may be ready to move to Step 3
Step 3: Push-ups Up from Your Knees and Down from Your Feet
Start with a push-up from your knees.
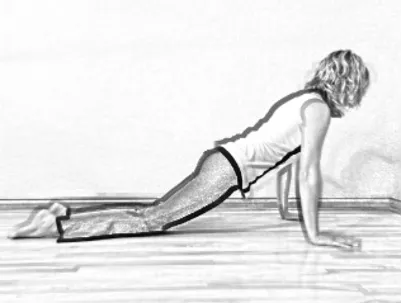
Figure 11‑6
When your elbows are straight, raise your knees off the ground so you are in a plank position. Keep your neck in a neutral position with your chin slightly tucked in. Your back should be straight.
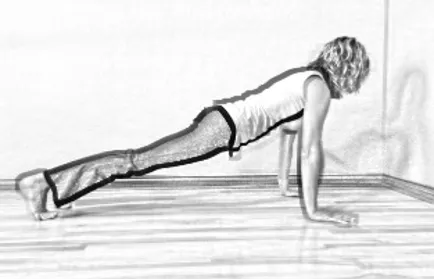
Figure 11‑7
Then lower like you would do in a full push-up. It’s easier to lower yourself into a full push-up position than it is to push up into a full push-up. Yet this variation is still more difficult than lowering from the knees.
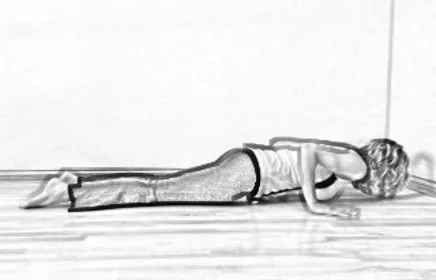
Figure 11‑8
When you are as low as you can go, lower your knees to the ground and push back up into the modified push-up position. This makes it easier to push up.

Figure 11‑9
Raise your torso up as in the modified push-up position. Once your elbows are straight, raise your knees off the ground into the plank position and lower back down. Repeat for a modified push-up.
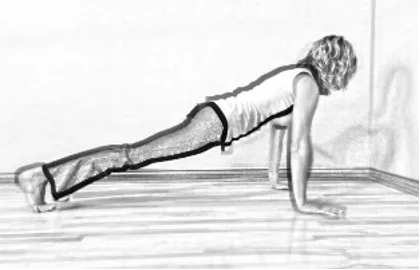
Figure 11‑10
When you can do these modified push-ups comfortably twenty times in a row, try full push-ups—Step 4.
Step 4: Full Push-ups
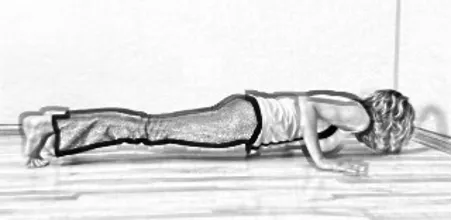
Figure 11‑11
From a plank position, lower your body until your nose almost touches the floor, keeping your elbows close to your sides. Then press your body back up into a full plank position.
Make sure that when doing push-ups, you do not dip or arch your spine. Keep your spine perfectly neutral throughout the push-up. Do not roll your shoulders or bend your wrists too far in any direction.
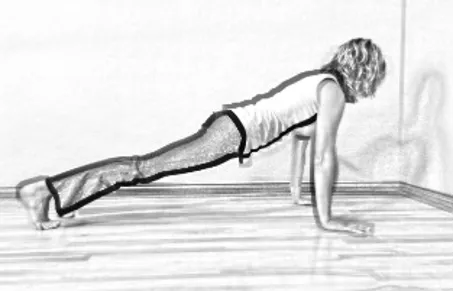
Figure 11‑12
When you are comfortable doing multiple full push-ups, try to work toward doing a handstand (see Chapters 12 and 13).
STRETCHING YOUR Low BACK MUSCLES WITH DOWNWARD DOG
DOWNWARD DOG is a popular yoga pose that stretches your back muscles as well as your leg and arm muscles. It starts off easy, as do most yoga poses, but it quickly gets harder. Don’t push yourself beyond your abilities when you first start with this pose. Gradually work up to the full pose. |
If you want to work toward doing a full handstand, the easiest way to start is by doing downward dog. After you’re comfortable in that pose, you can work on additional movements that will eventually have you standing on your hands.
To get into downward dog, start on your hands and knees with your hands under your shoulders and your knees under your hips (Figure 12-1). Curl your toes under, keeping your lower legs parallel and in line with your knees. The middle fingers should point forward, and your arms should be parallel to each other in line with your shoulders.
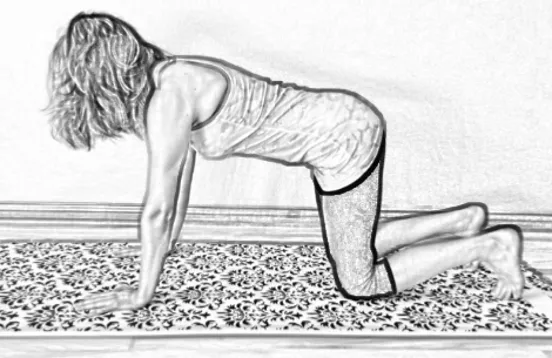
Figure 12-1: Start position for downward dog.
Do some angry cat and cow oscillations to find where your neutral spine is (Figures 12-2 and 12-3). Flex and extend your spine as far as you can. Your neutral spine should be somewhere between the cat and cow positions.
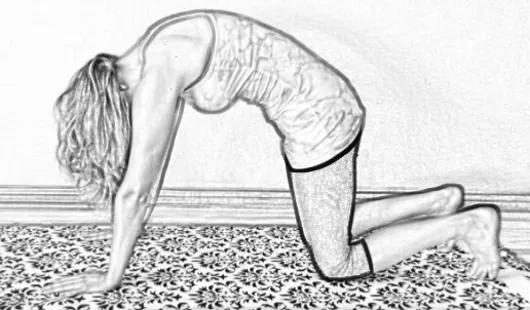
Figure 12-2: Angry cat pose.
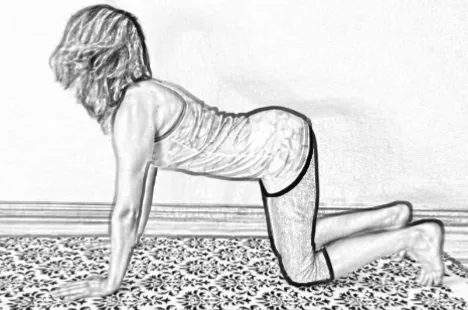
Figure 12-3: Cow pose.
Holding your neutral spine with your core muscles, push back with your arms and legs into downward dog (Figures 12-4 and 12-5).
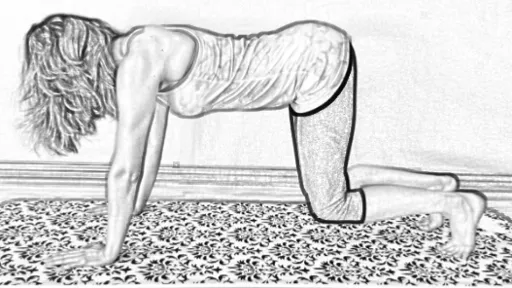
Figure 12-4: Pushing back into downward dog.
It’s more important to keep your neutral spine than to reach your heels to the floor:
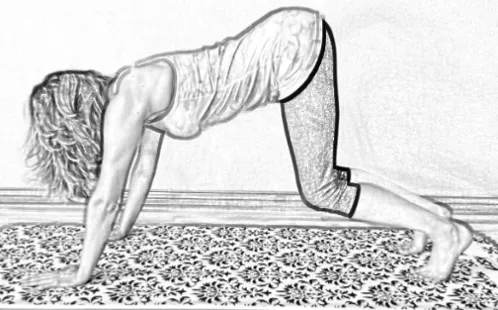
Figure 12-5: Going further into downward dog.
Warm up your legs by alternately bending your right and left legs (Figures 12-6 and 12-7).
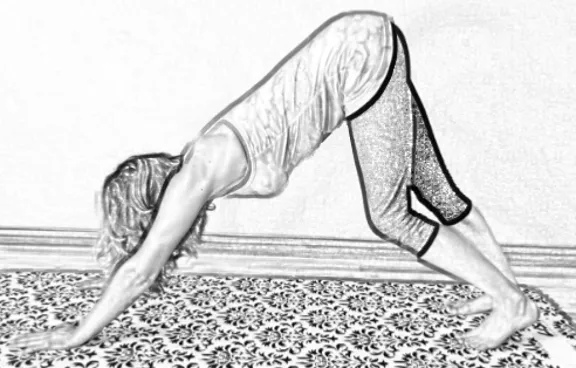
Figure 12-6: Reach your heels to the floor, but more important, keep the spine neutral (left leg).
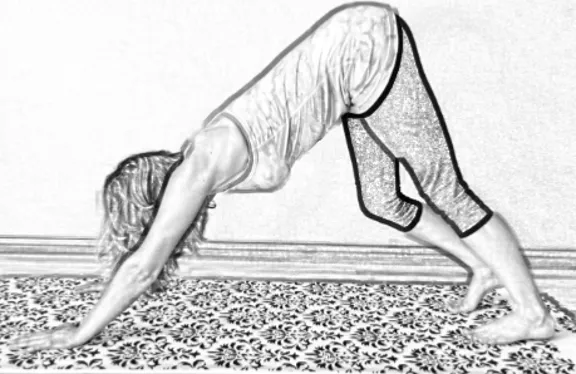
Figure 12-7: Reach your heels to the floor, but more important, keep the spine neutral (right leg).
Again, the goal isn’t to reach your heels to the floor, but to keep your spine neutral.
Feel free to keep your knees bent (Figure 12-8).
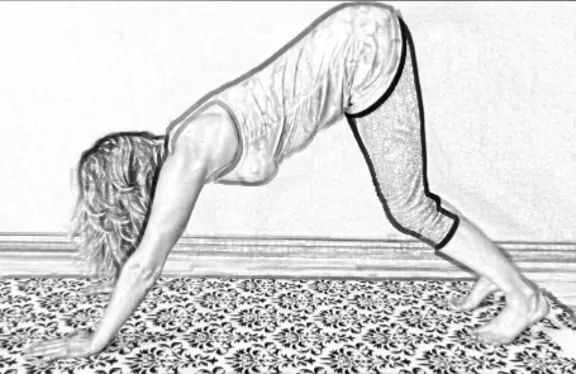
Figure 12-8: Downward dog with knees slightly bent.
Eventually (be it minutes, days, months, or years), you may be able to get into full downward dog (Figure 12-9).
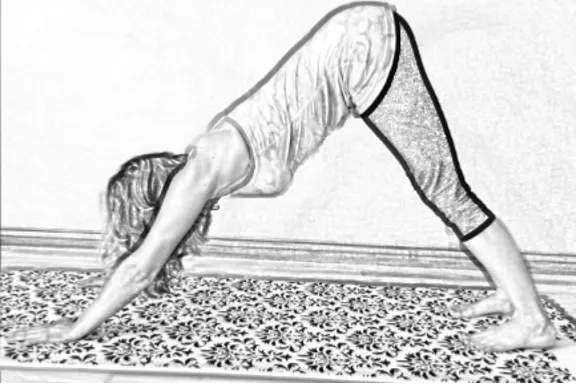
Figure 12-9: Downward dog for low back pain relief
When downward dog is comfortable and you are strong enough to do full push-ups, you are ready to try the steps toward getting into a handstand.
GETTING A HANDLE ON HANDSTANDS
A HANDSTAND is a high-intensity resistance exercise that burns a large number of calories in a short period of time. Plus, it strengthens your core and improves your balance, decreasing your risk of injury. Because it is hard to hold a handstand for any length of time, I do short handstands throughout the day. When you can finally do handstands, you will burn significantly more calories and get a surge of energy! |
If you do not have enough upper body strength to do a handstand, you can easily get hurt. Make sure you have built up enough strength and have practiced enough for your balance to lessen your likelihood of injury. Remember that you should always have a spotter with you while practicing handstands!
Note: Based on my yoga studies, I believe inversions should not be done during menses, even though scientific research doesn’t support this. Yoga has been around for millennia, which gives it some clout. Personally, I don’t feel like doing handstands during this time anyway. I use these few days as my restorative time. Instead of doing handstands, I lie down with my buttocks against the wall and my legs raised.
Step 1: Get into Downward Dog
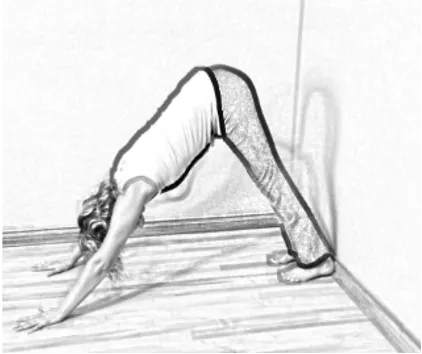
Figure 13-1
Get into a downward dog position with your heels up against a wall (Figure 13-1). (See Chapter 12 for instructions on how to do the downward dog pose.)
Step 2: Downward Dog with One Foot on the Wall
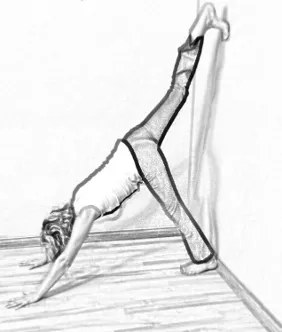
Figure 13-2: one leg up wall to help get into a handstand
Raise your right leg so you can put your right toes up against the wall (Figure 13-2). Your left foot should remain stable on the floor.
Straighten your right leg so your left foot lifts off the floor (Figure 13-3).
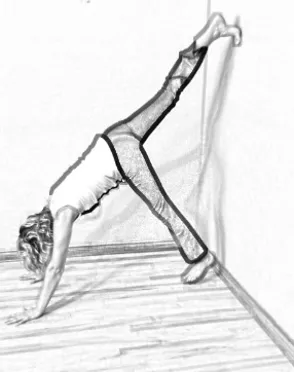
Figure 13-3
Hold for a few breaths. Lower the left foot back to the floor, then bring the right foot back to the ground so you are in downward dog again.
Repeat on the other side.
Mastering Step 2 may take days or weeks of practice, but regardless of how long it takes you, honor your body’s limitations. It’s not worth hurting yourself to move forward before your body is ready.
After this becomes easy and you can hold the inverted position comfortably for ten breaths on each side, you can advance to Step 3.
Step 3: Downward Dog to a Modified Handstand
When you feel you are ready for Step 3, make sure you have a spotter for your safety.
As with Step 2, go from a downward dog to the right foot on the wall and lift your left foot off the ground.
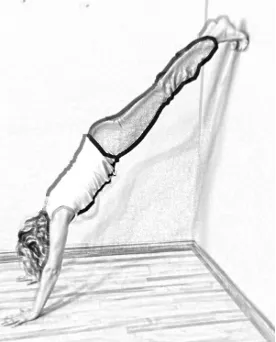
Figure 13-4
Then, with your spotter ready to assist you, raise your left foot to the wall alongside your right foot. You will be in an angled handstand with your feet on the wall (Figure 13-4).
To get out of this position, lower your right foot and then your left foot back to the ground, returning to the downward dog position. Do not drop from your feet on the wall to your knees onto the floor. That is a good way to hurt your kneecaps!
When you can easily hold this modified handstand for ten breaths, you can move on to Step 4.
Step 4: From Downward Dog to a Complete Handstand
When you feel you are ready for Step 4, you must have a spotter for your safety.
For this, go through Steps 1, 2, and 3 so both of your feet are on the wall in a modified handstand. Then, carefully walk your hands closer to the wall (Figure 13-5) with your spotter nearby in case you lose your balance.
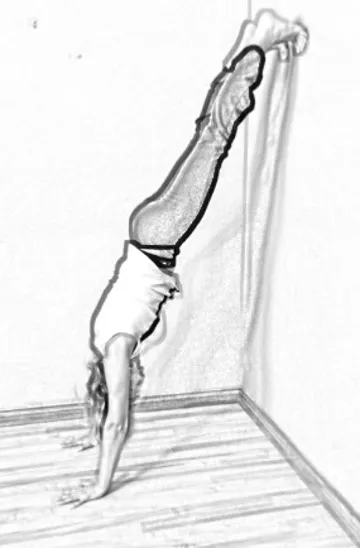
Figure 13-5
At first, you may only manage a single, small step with your hands toward the wall. That’s fine. Do not push your body beyond what it’s ready for. Hold the position for ten breaths, then reverse the action, taking a small step with your hands away from the wall and lowering back down.
Over time, you should be able to take more steps toward the wall (Figure 13-6).
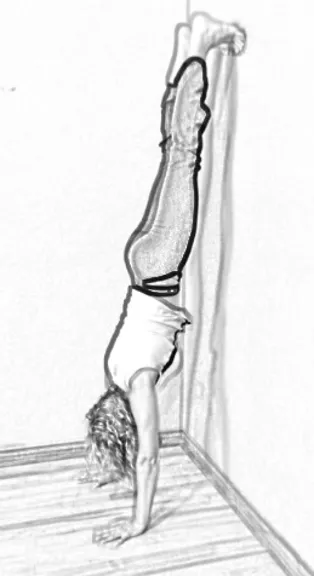
Figure 13-6
Maybe even play with lifting one foot off the wall (Figure 13-7).

Figure 13-7
Eventually, you should be able to get into a full handstand (Figure 13-8).
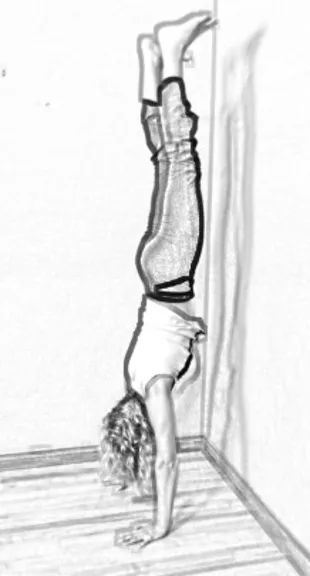
Figure 13-8: full handstand
To get out of a handstand, put your feet back on the wall and walk your hands away from the wall far enough so you can step down from the wall onto your feet, back to downward dog. Do not fall out of the handstand. You don’t want to land hard on your knees (which could injure your kneecaps) or your feet (which could bruise your toes).
You don't have to be in pain. Why wait?
To learn more about how we treat here at Drummond Chiropractic, CLICK HERE.
To go back to our home page, CLICK HERE.