Menu

Stretches and exercises for hip pain

Are you experiencing hip pain? 

Looking for hip stretches and exercises?

Check out our YouTube channel and stretches bellow...

STANDING STRETCHES FOR HIP PAIN

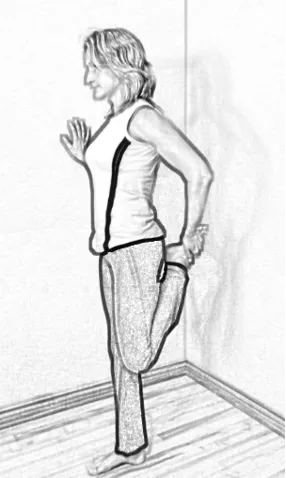
You may not think that the muscles in your thighs and lower legs would have much effect on your hip, but they do. Thigh muscles affect the hip by affecting the movement on the hip. The hip is a complex joint, so if the muscle cause a twisting action, the torque can cause hip pain.  Even feet issues can affect the hip and cause hip pain. More on this later. First, lets show some leg stretches.

Quad Stretch FOR HIP PAIN

quad for low back pain

Figure 6-1

If you have hip pain and tight quads, stretching the quads should help your hip pain. To stretch tight quads, stand near a wall. Steady yourself with your right hand on the wall, then lift your left foot and grab it with your left hand. If you find it difficult to reach your ankle, you can use a strap around your ankle to extend your reach. 

Pull your left ankle toward your buttock and hold for three breaths. Turn, and repeat on the other side. Do three sets of this stretch. 

TFL Stretch FOR HIP PAIN

tfl for low back pain

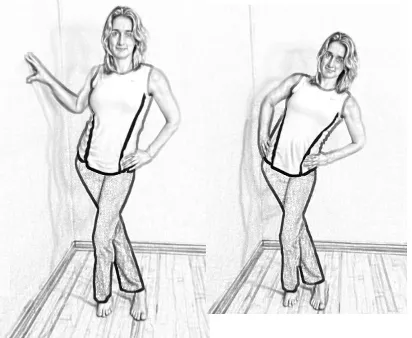
Figure 6-2

The TFL is a hip stabilizer. Tight TFL muscles can cause hip pain. To stretch the muscles on the outside of your legs (specifically the tensor fascia lata muscle and the iliotibial band that run from the hip to the knee), stand within an arm’s distance of a wall. Steady yourself by placing your right hand on the wall. 

Cross your left leg in front of your right leg so your feet are 12 inches apart and parallel to one another. If you find this difficult, stand with your feet hip width apart. Then stick your right hip out to the right while keeping your pelvis and spine straight.

You should feel a stretch in the lateral aspect of your right leg (close to your hip region). If you don’t, make sure you haven’t twisted your pelvis during the stretch. Try sticking your hip more to the right and move your pelvis around until you feel the stretch in the right lateral hip region. Hold the stretch for three slow breaths. With each exhale, you may be able to deepen the stretch.  It is more important to hold this stretch than to repeat it, as you should be able to go further into the stretch with each exhale. When you have reached your maximum stretch, switch to the other side.  

Lunges for hip pain

lunges for low back pain

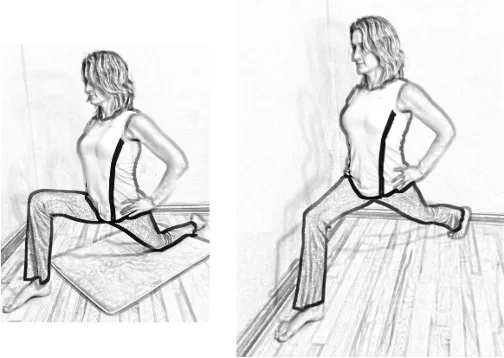
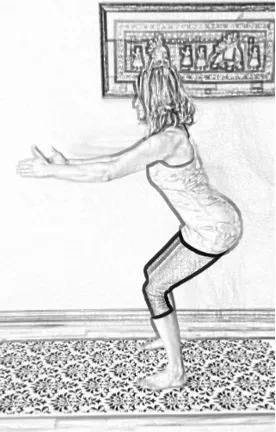
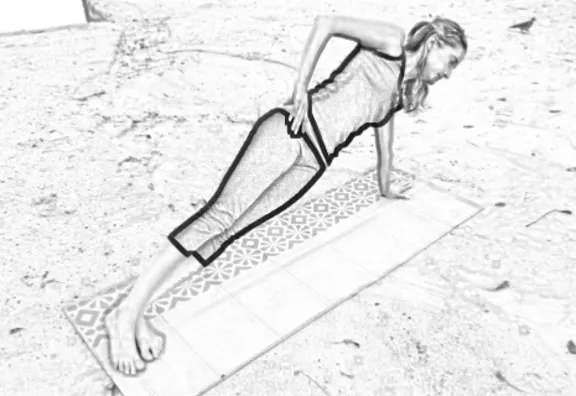
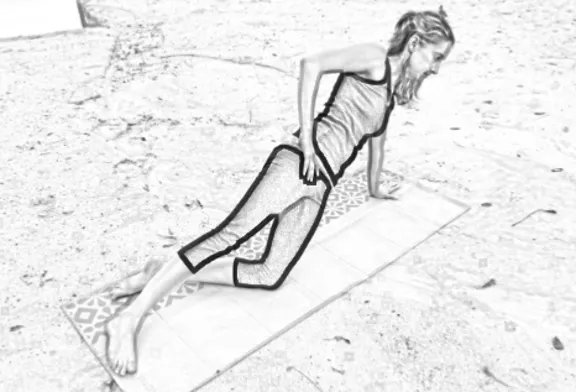
Figure 6-3

Tight psoas muscles can cause a twisting (torque) action on the hip, causing hip pain. Sitting for extended periods tightens your hip flexors (the iliopsoas muscles). To stretch those muscles, get up out of your chair, stand up straight, and then step back with your left leg, bringing your knee to the floor. (You might want to put a mat or pad on the floor to provide a cushion for your knee).

Make sure your right knee does not go past your right foot as you lower into the lunge.

 If you are stable, straighten your left leg (your back leg), and keep your right (front) knee bent as close to a 90-degree angle as possible. Keep your back straight and your pelvis pointing straight ahead. Don’t let your right knee go past the front of the right foot. You should feel a stretch in your left groin. If you do not, try moving your pelvis in different positions until you feel a stretch in your left groin.

Hold the stretch for five breaths, and then switch to the other side, extending your right leg backward and bending at your left knee. Do a total of three lunges on each side. 

Forward Bends FOR HIP PAIN


forward bend for low back pain

bend for low back pain

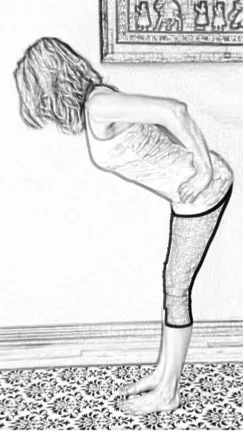
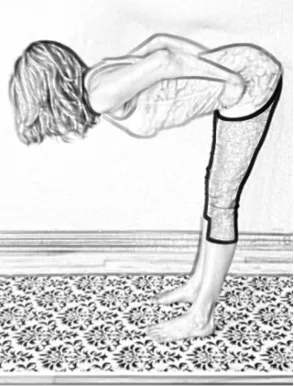
Figure 6-7

These forward bends stretch your hamstrings. Remember flexible hamstrings make for happier hips. Make sure you are feeling the stretch in your hamstrings and not your low back during this stretch.

Begin a forward bend by bending forward at the waist. Make sure you lead with your chest and not your head. If you strain to reach farther, you may harm your back versus stretching your muscles.

Keep your back in a neutral position as you hinge forward at the waist. You may not go as far as I am in Figure 6-7, but if you are feeling a stretch, you are improving the mobility of the muscles you are feeling the stretch in. As you hinge forward, pay attention to where you are feeling the stretch. If you are feeling a stretch in your hamstrings (the back of your thighs), then great! You are stretching your hamstrings! 

If you are feeling a strain in your back, you are straining your back. Stop! Come back up and try again. 

Aim to reach your hands to the mat (Figure 6-8), keeping your back as neutral as possible, to keep the stretch in your hamstrings.

bend for low back pain

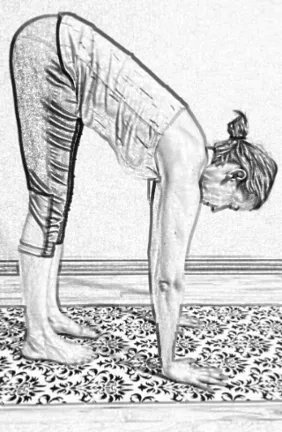
Figure 6-8: A forward bend with hands to the mat, keeping the back flat.

It may take months or even years before you can press your palms to the mat without arching your spine, but your range of motion will improve in the process. Maybe you can work toward getting your hands to the floor or your nose to your knees (Figure 6-9). Whatever your goal, as long as you improve or maintain over time, you are a success!

full bend for low back pain

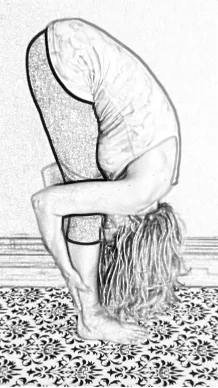
Figure 6-9: A full forward bend

In a full forward bend, the low back is stretched with the hamstrings. When you stretch the low back in s full forward bend, the weight of the upper body helps create space between the vertebrae of the low back. If you curve the low back too soon, the weight of the upper back is away from the center of gravity and can compress the front of the discs of the low back. This can injure those discs.

bad bend for low back pain

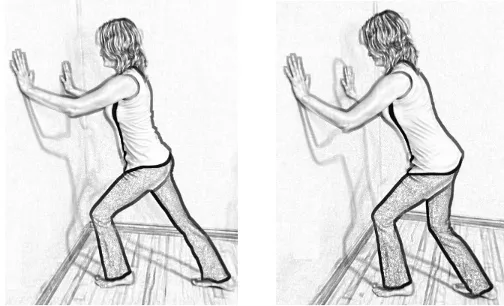
Figure 6‑10: Good versus bad entry into a forward bend 

Calf Stretches FOR HIP PAIN

calf stretch for low back pain

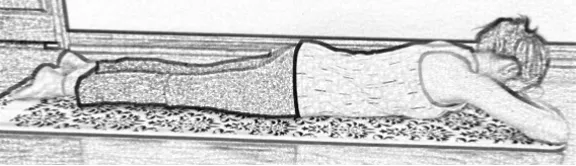
Figure 6-10

Tight calf muscles can strain the knee, which can lead to hip pain. To stretch the calf muscles in the back of your lower leg, stand facing a wall and put your hands against the wall. Bring your right leg back and stretch your right heel toward the floor (this stretches the gastrocnemius muscle at the back of your calf, connected to the Achilles tendon). Hold for three breaths. Then bend your right knee to stretch the soleus muscle (the deeper muscle under the gastrocnemius). Hold for three breaths. 

Repeat on the other side.

Remember, it is not the duration that matters, but the frequency that helps the most. I would rather you do this stretch once every hour versus ten times all at once. Doing this frequently helps break the cycle of chronic contraction of these muscles, which impairs blood flow and lymphatic drainage. That said, if you have time, do three sets of this stretch every hour.

STRETCHES TO PERFORM WHILE LYING DOWN

AS MENTIONED in earlier chapters, a strong core and a flexible spine make for a healthy and happy hips. This chapter has examples of stretches for your legs that you can do while lying down. 

If you are struggling to find time to stretch, these stretches can be done in the comfort of your own bed before getting up in the morning and again in bed before you go to sleep. 

Side Lying Stretch

 This stretch is a great way to stretch the muscles that run along the side of the body (the TFL, abdominal obliques, quadratus lumborum, lateral chest muscles, and more). 

tfl for low back pain

Figure 7‑1: Stretching the side body

The top side is the side that is stretched with this stretch.  To stretch the right side, raise the right arm over your head, drop the right leg back and down, keep your right hip over your left hip (don’t allow your pelvis to tilt back), and reach your right foot to the ground.  Hold for three breaths, deepening the stretch with each breath, and then switch to the other side.

Supine Stretches FOR HIP PAIN

Knee hugs:

knee hug for low back pain

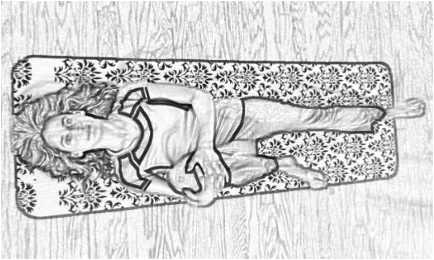
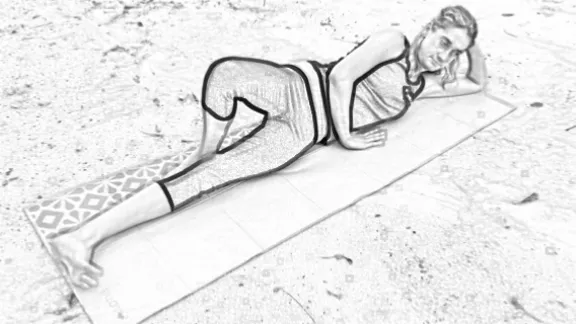
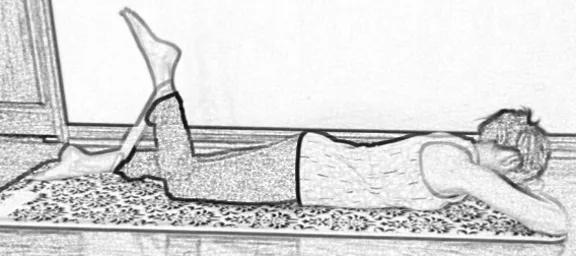
Figure 7-7

To stretch your knee, bend your right knee to your chest (Figure 7-7).

To stretch your glutes (buttock muscles) by bringing your right knee to your left shoulder (Figure 7-8). 

knee hug for low back pain

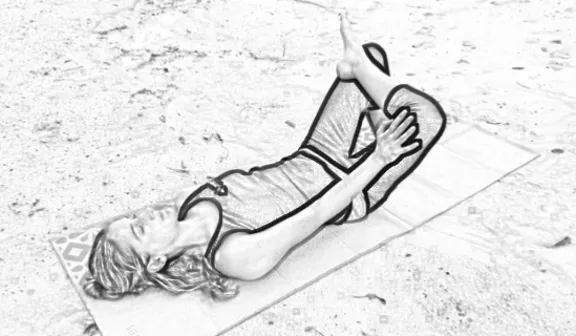
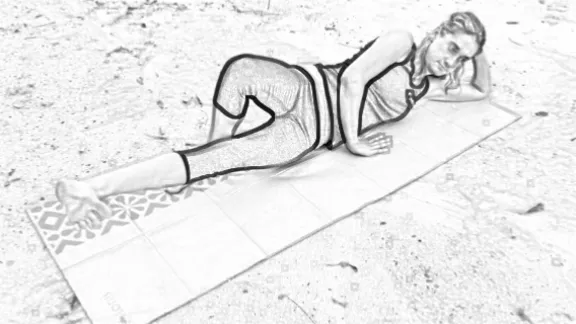
Figure 7-8

To stretch your right hip, bend your left leg with your foot resting on the mat. Then rest your right foot on your left knee. Stretch the right hip by pressing your right knee out with your right hand (Figure 7-9). 

piriformis stretch for low back pain

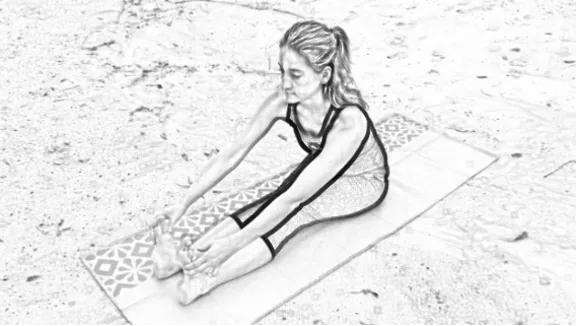
Figure 7-9

To stretch your hamstrings from a seated position, sit with your legs straight out in front of you. Then reaching for your toes (Figure 7-14). Hold the stretch for a few breaths and then relax. Repeat the stretch three to five times. 

hams for low back pain

Figure 7-14

Don’t worry if you can’t reach all the way to your toes when you start doing this stretch. Just keep trying, and in time you will see that you are getting closer and closer. Celebrate every increment! 


STRENGTHENING THE LOWER EXTREMITIES FOR HIP PAIN

wall squat for low back pain

Figure 9‑1

 To exercise your quadriceps muscles, stand with your back against a wall, walk your feet out farther than the length of your thighs, and squat by sliding your back down the wall (Figure 9-1). Protect your knees by not squatting too deeply; do not allow your knees to go past your feet. Hold this position for five breaths. This is a great way to strengthen the quads when you have low back pain because your back is supported by the wall. It is also a good exercise to repeat throughout the day for leg strengthening, making for a quick calorie burn. 

Stronger Quad (Thigh) Strengthening FOR HIP PAIN


squat for low back pain

Figure 9‑2: Freestanding squats.

After you are able to do wall squats comfortably, try doing freestanding squats.

Stand with your feet shoulder width apart. Then extend your arms in front of you and move your buttocks back as if you’re going to sit in a chair (Figure 9-2). Make sure your knees don’t move forward in front of your feet because this can strain the knees. 

Work toward repeating a dozen times, and then repeat this several times throughout the day. You can do this exercise anywhere, and it doesn’t take long to do. Again, the frequency—not the intensity or duration—is what’s important to build strength and combat the effects of sitting too much.

After you’ve mastered freestanding squats, try going even lower with your squats (Figure 9-3).

squat for low back pain

Figure 9‑3: Deep squats.

The deeper the squats, the more intense the workout, and the more you are working the abdomen.

For an even more intense quad workout, add a weight to your thighs while doing a wall squat (Figure 9-4).

wall squat for low back pain

Figure 9‑4: Adding a weight to wall squats.

The added weight places even more strain on your knees, so make sure you keep your knees behind your toes and over your heels. 

Adductor (Inside Thigh) Strengthening FOR HIP PAIN

 To work the inside thigh muscles, place a ball between your knees while you are doing a wall squat (Figure 9-5). Squeezing your knees against the ball will strengthen the adductor muscles. 

wall with ball squeeze for low back pain

Figure 9‑5: Squeeze a ball between your knees to strengthen your thigh muscles.

You don't have to be in pain. Why wait?

click here to schedule with the best chiropractor

to schedule with us.

An alternative is to lie on your left side, bend your right knee, and place your right foot behind your left leg (Figure 9-6). 

adduction for low back pain

Figure 9‑6: The starting position for adductor muscle strengthening.

Support your head with your left hand. Stabilize yourself by placing your right hand on the ground. Keep your pelvis perpendicular to the ground and protect your low back by keeping your spine in line. Don’t allow your right hip to roll back or forward. Keep your right foot on the ground behind you. Flex your left foot so your toes lift toward your head. 

Now you are in a position to work out your left adductor muscle. To do so, contract your inner left thigh by lifting your left foot away from the ground (Figure 9-7). If you feel your front or back thigh muscles engaging, you are not in the correct position.

adduction for low back pain

Figure 9‑7: Contracting the left adductor muscle.

Exercise your left thigh by repeating this exercise a few times, and then roll over and exercise your right thigh. 

Strengthening the adductor muscles helps stabilize the hips and pelvis, making your back less vulnerable to injury. 

TFL Strengthening FOR HIP PAIN

tfl for low back pain

tfl for low back pain

Figure 9‑8: Side leg raises to strengthen the TFL.

To exercise the muscles on the outside of your thighs, lie on your right side. Keep your hips perpendicular to the floor (one hip on top of the other). Raise your left hip. Keep your toes pointed toward your face as you lift your left leg. Pause at your farthest point for a breath or two (Figure 9-8). Then lower your left leg and pause for a breath or two just before it touches the right leg. Repeat three to ten times. Then repeat on the other side.

To increase resistance and make this exercise more difficult, put a mini loop exercise band just above your ankles (Figure 9-9). You can buy a set of mini loop exercise bands online for under $10. 

tfl for low back pain

tfl for low back pain

Figure 9‑9: Side leg raise with an exercise band.

Perform the same movements as described in the previous TFL exercise. The band will make it more intense.

You can also work out your TFL muscles using the mini loop exercise band while standing.

tfl for low back pain

tfl for low back pain

Figure 9‑10: Crab walk with an exercise band.

Place the mini loop exercise band above the ankles. Bend slightly at the waist; hold your arms, bent at the elbows, in front of your body; and keep your knees above the arches of your feet. If you let your knees go in front of your feet, you risk harming your knees.

 Move your left leg sideways away from your right leg as far as you can and then plant your left foot on the mat (Figure 9-10). Move your right foot back to your left foot and repeat. You will slowly move to your left. Sometimes this exercise is referred to as the crab walk.

When you have moved as far as you want to go, reverse, and walk sideways back to your start position. Repeat three times.

tfl for low back pain

Figure 9‑11: Crab walk from the side view.

Again, note how the knees are over the arches of the feet while doing the crab walk (Figure 9-11).  Keep your knees behind your toes because you don’t want to hurt your knees while trying to help your low back.  

Combining TFL Strengthening With Core Strengthening


plank for low back pain

Figure 9‑12: A basic side plank.

A side plank (Figure 9-12) is a great way to strengthen the lateral thigh muscles and your core muscles at the same time.  

Get into a side plank by starting in a plank position. Place your left hand under your nose, then turn to the right so the lateral aspect your left foot is on the ground and your right foot rests on top of your left foot. Make sure your left hand is placed under your shoulder, your left wrist is in a comfortable position, and your body alignment is straight (so your pelvic bones are on top of each other, not tilted forward or backward).

If this is too difficult, you can rest your left knee on the ground as in Figure 9-13.

An Easier Side Plank FOR HIP PAIN


plank for low back pain

Figure 9‑13: Modified Side Plank.

If placing the weight of your upper body on your arm causes wrist pain, you can hold this position from your left forearm instead of your left wrist. Simply rest the side of your forearm from your elbow to your wrist and the side of your hand on the ground.

A Harder Side Plank FOR HIP PAIN

To make this more intense for your TFL, raise your top leg. To really work your core at the same time, raise your top arm (Figure 9-14). 

plank for low back pain

Figure 9‑14: An advanced side plank.  

Hamstring Strengthening FOR HIP PAIN

hams for low back pain

hams for low back pain

Figure 9‑15: Strengthening the hamstrings with mini loop bands.

To strengthen the muscles in the back of your thighs, put a mini loop exercise band around your ankles and lie on your stomach. Keep your left leg straight and on the ground as you bend your right knee (Figure 9-15). The resistance from the band will strengthen the right hamstring. 

Do three to five right knee bends, and then repeat on the other side. Repeat three times as long as you feel no pain in the knee joint. You don’t want to sprain your knee while trying to strengthen your hamstrings. 

To learn more about how we treat here at Drummond Chiropractic, CLICK HERE.

To go back to our home page, CLICK HERE.

You don't have to be in pain. Why wait?

click here to schedule with the best chiropractor

to schedule with us.


After your first visit with us, you will receive an email with your personalized home stretches and exercise regimen in a Report of Findings. To see an example of one, check out this video:


All of our chiropractors specialize in low back and hip pain.
Drummond Chiropractic, LLC
Your Downtown Hip Pain Chiropractic Specialists
565 N Walnut St,
Bloomington, IN 47404
(812)336-2423


Why Wait?

Make an appointment today!

Our Location: Drummond Chiropractic

565 North Walnut Street | Bloomington, IN 47404

Office Hours

Our Clinic Hours (all other times by appointment only)

Monday:

8:00 am-6:00 pm

Tuesday:

8:00 am-6:00 pm

Wednesday:

8:00 am-4:30 pm

Thursday:

8:00 am-6:00 pm

Friday:

8:00 am-6:00 pm

Saturday:

Closed

Sunday:

Closed