
Do you have neck pain? Neck stiffness?
Looking for neck stretches?
Looking for tips for neck stiffness and pain, check out the Videos Below:


You do not have to keep suffering with neck pain.
We can help!
Why Wait?

to schedule with us today!
FLOOR STRETCHES AND EXERCISES FOR NECK pain
AFTER BEING INVOLVED in a car crash, I could barely move. My neck pain was too acute and swollen to manipulate, so stretching my neck and doing passive modalities like electrical muscle stimulation, massage, and kinesio taping my neck was my only option. |
I cannot stress enough that if you have neck pain, it is imperative that you stretch your tight muscles and strengthen your loose muscles. When your muscles aren’t too tight and aren’t too loose, you will hold the beneficial effects of your treatments longer and be less vulnerable to injury. Research supports that home exercise is more effective than taking medicine for long term relief of pain.[1]
In this chapter, I share some of the floor exercises and stretches I used to loosen up my neck and back, providing me relief from my pain and stiffness. I was determined to go from having a stiff, almost immobilized spine to one that could move enough to do my activities of daily living.
Stretching for Neck pain
To loosen up your neck, turn your head from side to side and then tilt your head left and right. To work on the extension of your spine, lie on your stomach, face down on the mat, with your hands palm up at your sides. With your nose and chin on the mat, carefully lift your head a off the mat using your back muscles (Figures 9-1 and 9-2).
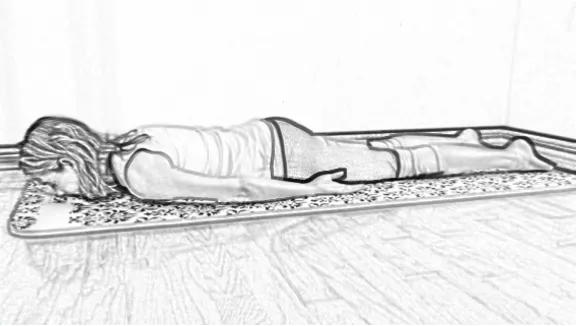
Figure 9-1: Lying prone (facedown) with the chin lifted off the mat.
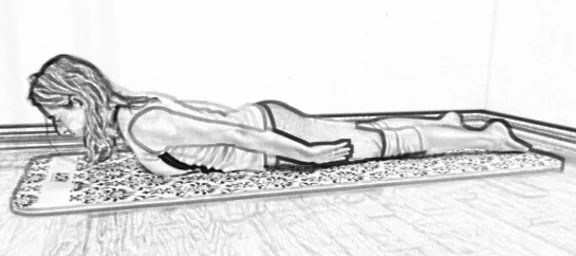
When you can do that comfortably, lift your head and chest off the mat (Figure 9-2). Contract your back muscles to lift your head and chest off the mat for an active back bend.
Then slowly lower your head, resting your head on the mat turned to the right as far as possible (Figure 9-3). If you can’t turn your head all the way to the right, turn it as far as you comfortably can. After going through this routine a couple of times, your neck should loosen up. Your range of motion will improve a little bit with each repetition.

Figure 9-3: Strong stretch for the neck to the right.
Once your neck relaxes, bring your head back to center, and raise your head slightly again (Figure 7-4). If it feels like you are straining, back off. If not, lift it higher. You can place your arms in front of you to support your upper body if you want a more passive stretch for your low back.
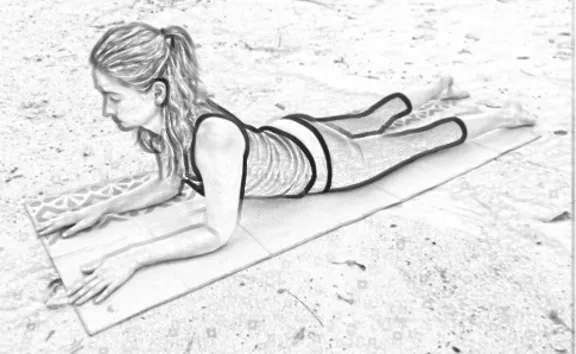
Figure 9-4: Passive back bend.
Then lower your head back onto the mat with your head turned to the left (Figure 9-5). Relax, allowing your muscles to elongate.
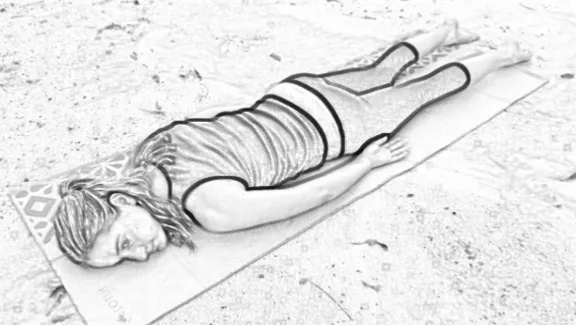
Figure 9-5: Strong stretch for the neck to the left.
Then bring your head to the center and repeat the series of moves. Go a little bit higher each time without straining yourself. Repeat three times.
When your neck does not feel any strain when you lift it off the mat, lift your hands as you raise your head (to strengthen your back muscles and work on your back extension; Figure 9-6).
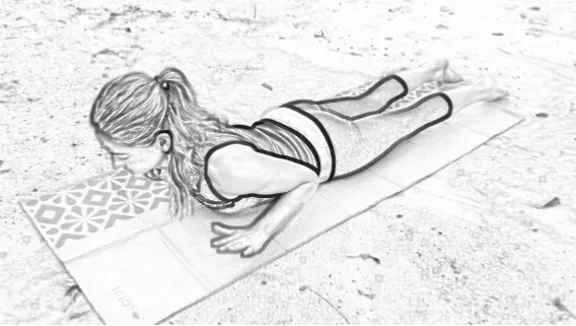
Figure 9-6: Active back bend.
Stretching the Back to help relieve neck pain
Get on your hands and knees to do cat and cow poses (Figure 9-7), breathing in with cow and breathing out with cat. This is a great way to loosen up your mid-back as well as your neck. Repeat the sequence three to five times.
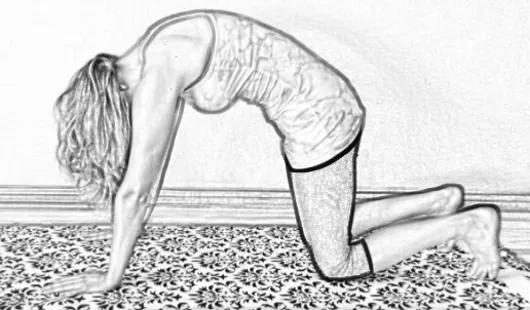
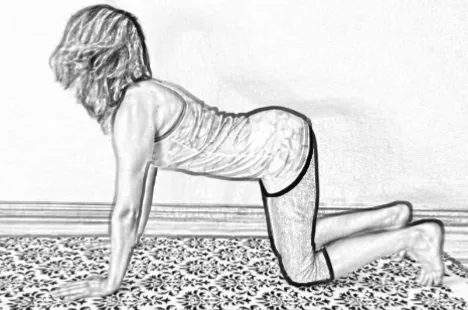
Figure 9‑7: Cat and cow pose.
Then roll onto your back to do some additional back stretches, which can help ease your neck pain.
Start with the basic passive back bend. You only need two items to make this stretch effective. The first is a soft, flat surface. Figure 9-8 shows me using a mat because my floors are hardwood. A mat provides some cushioning between your body and the floor. You could also simply lie on the carpet or a rug; just make sure you have enough cushion for your back to feel comfortable.
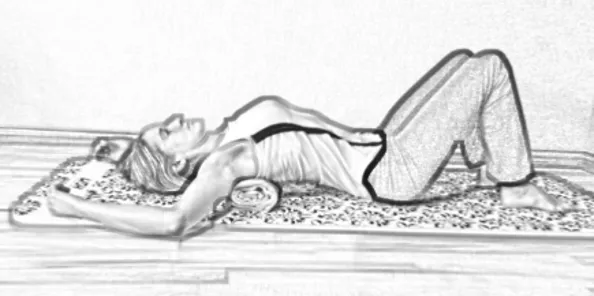
Figure 9‑8: Passive back bend with a rolled-up towel.
The second item you need is a large towel. Roll the bath towel into a tube and place it perpendicularly on the mat or floor.
Lay down so the towel is behind your back at the level of your shoulder blades (Figure 9-8). You can place your arms along your sides. For a deeper stretch, raise your arms above your head along the mat. This helps passively extend your back. The more mobile your mid-back is, the easier it is to stand and sit up right. The easier it is to hold a better posture, the better your neck will feel. Slouching strains the neck and is best to avoid.
If you need a deeper stretch, use a foam roller instead of a rolled-up towel (Figure 9-9).
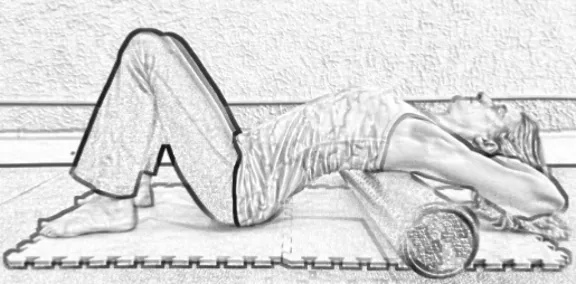
Figure 9‑9: Strong passive back bend.
Lay in this position as long as is comfortable, but no longer than five minutes at one time. If you stay in this position too long, you may elongate your ligaments to a point that you may be vulnerable to moving your spine incorrectly, which could result in you tweaking your back.
Extending your spine this way helps counteract reaching and/or slouching all day. If you don’t take the time to work on the extension of your mid-back, you will become more rigid in your forward bend, which strains your neck over time.
Stronger Passive Back Bends to prevent neck pain
You can also use an exercise ball to do a passive back bend. I advise people to sit on an exercise ball for twenty minutes every hour or so, whether you’re at home or at the office. Using an exercise ball is a great way to move while you sit, and then you can use it to do passive back bends throughout the day. Remember, it is not how long you stretch for, but how frequently you stretch is much more important. Small stretches every hour will benefit you much more than a whole hour of stretching and then sitting all day, as the sitting will stiffen you right back up. Versus the regular frequent stretching that keeps you loose through out the day. The looser you are, the less pain you will experience.

Figure 9‑10: Passive back bend over an exercise ball.
To do a passive back bend on an exercise ball, simply sit on the floor holding the ball behind you. Then move up the ball as it rolls under you until you are arching your back over the ball as far as you comfortably can (Figure 9-10).
Frequency is more important than intensity or duration with this stretch. You can stay in this position for a few slow breaths and then repeat it throughout the day. This is why it’s nice to have an exercise ball at work; you can sit on it for twenty minutes, stretch on it, stand for twenty minutes, stretch on the ball, and sit again.
As you become more flexible and get more comfortable moving on the ball, you can do a full back bend on the exercise ball.
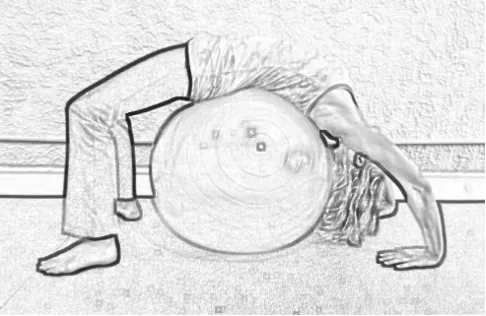
This requires you to roll back on the ball and then reach your arms and hands over your head to brace yourself on the floor (Figure 9-11). This is a more comprehensive stretch in that it works your arm, back, thigh, calf, and feet muscles, not to mention your abs.
Figure 9‑11: Back bend over an exercise ball.
Wheel Pose for neck pain
After you are comfortable doing back bends on the exercise ball, you can work toward doing the wheel pose, which is shown in Figure 9-12.
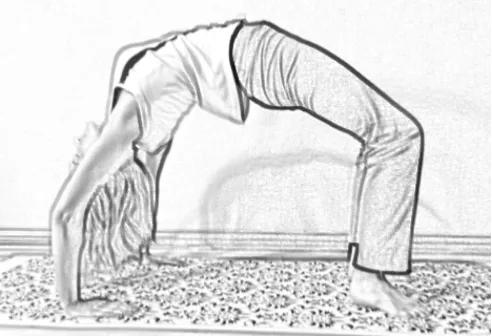
Figure 9‑12: Wheel pose.
It took me over a year of daily stretching and strengthening to get back to doing the wheel pose after my crash. If you have no experience with the wheel pose, see a yoga instructor for the best way to enter this pose. This pose is as hard as it looks, and if you don’t understand the proper way to get into and out of it, you could injure yourself. It’s best to master the other back bends in this chapter before attempting the wheel pose.
Mountain Pose for neck pain
The mountain pose is a standing stretch. Check your plumb line, making sure your ears are over your shoulders, your shoulders are over your hips, and your hips are over your knees and ankles (Figure 9-13).
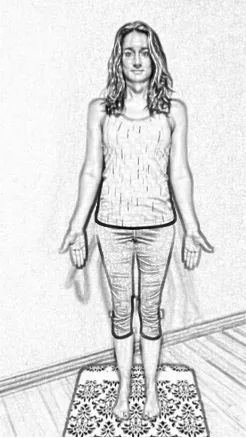
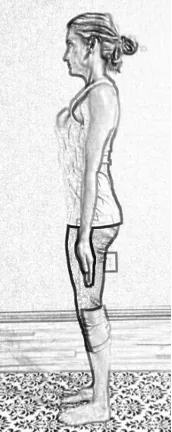
Figure 9‑13: Mountain pose from the front and side.
Plant your feet onto the mat. Make sure your toes are spread apart and you can feel your heels pressing evenly into the ground. The base of your big and little toes should bear equal weight. This triangular pattern of weight bearing on the feet is important for stabilization of the pose. This pose strengthens the muscles that are involved with holding a healthy posture, which is imperative for a healthy neck.
Working toward Forward Bends for neck pain
A human head weighs an average of 10 pounds. That’s a lot of weight for your neck to support day in and day out. Just think how nice it would feel to be able to hang your head upside down and let gravity pull your head and neck in the opposite direction. Forward bends allow you to achieve this. But most people have to work up to the ultimate forward bend, where you look like you’re bent in half at the waist.
One of the things I like about forward bends is that they work so many other muscles at the same time. So, while you’re working to loosen your neck muscles, you’re stretching other muscles.
Begin a forward bend by bending forward at the waist (Figure 9-14). Make sure you lead with your chest and not your head. If you strain to reach farther, you may harm your back versus stretching your muscles.
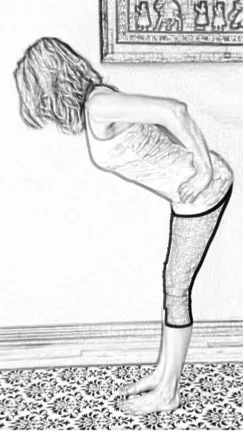
Figure 9‑14: A forward bend.
Keep your back in a neutral position as you hinge forward at the waist. You may not go as far as I am in Figure 9-14, but if you are feeling a stretch, you are improving the mobility of the muscles you are feeling the stretch in. So as you hinge forward, pay attention to where you are feeling the stretch. If you are feeling a stretch in your hamstrings (the back of your thighs), then great! You are stretching your hamstrings!
If you are feeling a strain in your back, you are straining your back. Stop! Come back up and try again.
Aim to reach your hands to the mat (Figure 9-15), keeping your back as neutral as possible, to keep the stretch in your hamstrings.
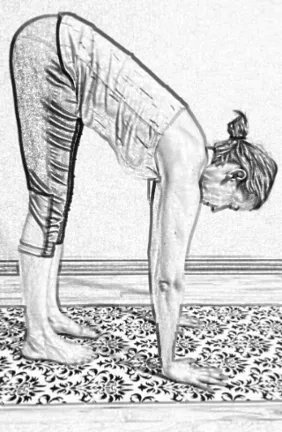
Figure 9‑15: Forward bend with hands to mat, keeping the back flat.
It may take months or even years before you can press your palms to the mat, but your range of motion will improve in the process. Maybe you can work toward getting your hands to the floor or your nose to your knees (Figure 9-16). Whatever your goal, as long as you improve or maintain over time, you are a success!
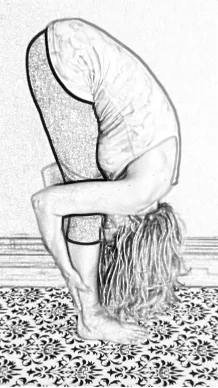
Figure 9‑16: The ultimate forward bend.
Forward bends are a great way to traction your neck with the weight of your head.
Being Aware of Your Body in Space
If your neck pain is due to an injury, you may need to work on your proprioception (the awareness of your body in space without using your vision or inner ears). The body is not quite the same after an injury, no matter how minor, so I always have my patients check their proprioception. Proprioception allows you to correct off-balance movements and prevent falls caused by imbalance. Jarring actions of even catching yourself from falling can re-exacerbate neck pain. Strengthening your awareness of where your body is in space will make you less vulnerable to any type of re-injury.
You can test your proprioception by standing on one foot and closing your eyes (Figure 9-17). With your eyes closed, you can’t rely on your vision to tell you where you are in space. Because you are not moving, your inner ears can’t help you either. You are relying solely on your proprioception.
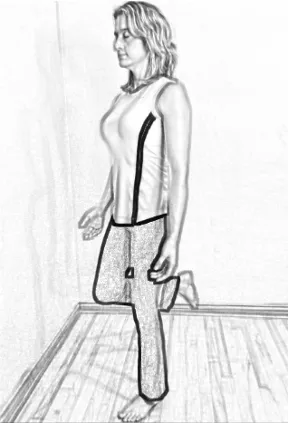
Figure 9‑17: Testing my proprioception.
If any bone in your body is misaligned, you will have a difficult time standing on one foot with your eyes closed because your brain automatically sends signals to your muscles to make minor adjustments to keep your body upright. If your body isn’t aligned as your brain expects, the muscle corrections will actually be incorrect and you will start wobbling.
If you can’t stand on one leg with your eyes closed for more than thirty seconds (three minutes on a wobble board if you are in sports), then you are more prone to injuries because you are visually dependent for your balance. If you get visually distracted for a short period of time, you will likely misjudge where you are in space and potentially get hurt (misplace your foot and roll your ankle for example).
Proprioception Exercise
Most people lose their balance as they age. I attribute this to the fact that many people do not exercise their balance. How often do you stand on one foot with your eyes closed? If you don’t use it, you lose it.
In addition to relying on your vision to tell you where you are in your surroundings, you have mechanisms in your inner ears that tell your brain how you are moving. Nerve fibers throughout your body give your brain even more input as to where you are in space.
To exercise your body’s proprioception, you need to remove two indicators of your body’s position: sight and detection of movement by your inner ears. You can do this by closing your eyes (to remove the visual reference) and standing still on one leg (without movement, your inner ears aren’t much assistance). You should do this by a wall or with your hands hovering over a counter so you can prevent yourself from falling if you start to wobble too much (Figure 9-18).
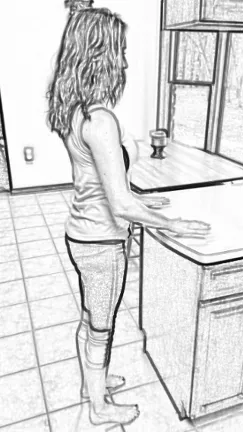
Figure 9‑18: Working on proprioception while hovering my hands over a counter, eyes closed, and standing with one foot off the floor.
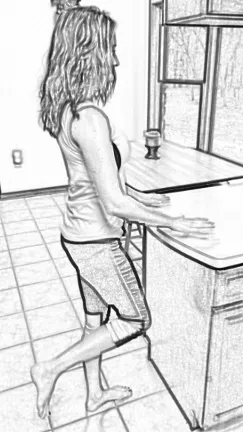
You should be able to do this for at least thirty seconds per leg (three minutes if you are an athlete). If you cannot, then you are vulnerable to injury if you get visually distracted and misstep. Good proprioception allows you to catch yourself from falling, making you less likely to twist an ankle (or, when you’re elderly, break a bone). If you don’t practice your proprioception, you are more likely to fall, resulting in injury.
Everyone should do this exercise every day. People sit too much, often with poor posture. If you don’t fight the effects of sitting, you become more bent and stiff with time. Your brain doesn’t notice this slow process, and when you reach that tipping point, you start misjudging where you are in space to such a degree that you become clumsy. I have had patients who started having multiple falls in situations where they shouldn’t, for example, when going from carpets to hard flooring. Once they worked on their proprioception, they didn’t fall as often (if at all).
Once you can comfortably stand on one leg with your eyes closed for thirty seconds, you may be able to do this exercise next to a wall, making it easier to do throughout the day.
SEATED STRETCHES TO HELP RELIEVE NECK AND ARM PAIN
MOST NECK PAIN involves tight posterior neck muscles, weak muscles between the shoulder blades, and tight pectoral (chest) muscles. This chapter shows you how to stretch the posterior neck muscles and tight pectoral muscles. |
These stretches are good for alleviating neck pain, headaches, and pain that radiates down the arms, all of which can be a result of poor posture, poor work ergonomics, injury, and/or degeneration over time.
Unless otherwise noted, you can do these stretches either sitting or standing. If you sit at a desk all day, I encourage you to stand up when stretching.
Most of these stretches are in my Top Seven Ways to Combat the Effects of Sitting book. If you have read this book, you can skip this chapter (unless you need a refresher on the exercises).
As always, confirm with your health provider that these stretches are safe and appropriate for you.
Neck Rotation to improve neck mobility
Figure 10‑1 |

Simply turning your neck left and right will stretch the muscles of your neck and upper back (Figure 10-1). Turn your head to the right until it’s in line with your shoulder. Hold the position. Then repeat on the left. Keep your shoulders down and away from your ears during this stretch.
These movements don’t take long and are easy to sneak in throughout the day. Even during a meeting, you can take a moment to look far to the right and left.
Neck Flexion To Improve Neck Mobility
Figure 10‑2 |
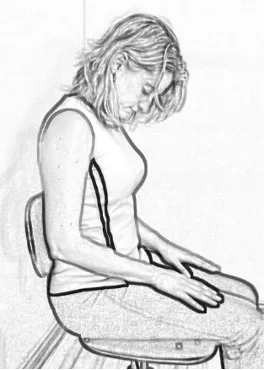
To perform the neck flexion, look down and tuck your chin in to stretch the upper back muscles (Figure 10-2). People tend to sit with their chins jutted out, which elongates and weakens the muscles in the front of the neck. Tucking your chin in adds to the stretch in the muscles in the back of the neck and strengthens the muscles in the front of your neck.
Neck Lateral Flexion To Improve Neck Mobility
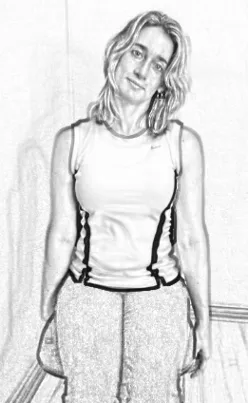
Figure 10‑3
When you perform the neck lateral flexion stretch, you stretch the muscles in the sides of your neck. To do this stretch, hold your chair seat with your right hand to anchor your right shoulder down as you tilt your head to the left (Figure 10-3). You can lean your head slightly forward and back to stretch different muscle in the side of your neck. Hold each position for at least three breaths, and then repeat on the other side to stretch the left lateral neck muscles.
If you are standing, hold your right wrist with your left hand to anchor your right shoulder down as you tilt your head to the left. Again, you can lean your head slightly forward and back to stretch different muscles in your neck. Hold each position for at least three breaths. Repeat on the other side.
You can deepen this stretch even further. When stretching the right side of your neck, stretch your right hand to point your fingertips down and slightly out. Then. using your left hand, reach across the top of your head and gently press on the right side of your head to slightly extend the stretch. Be careful not to press too hard; the goal is to stretch your neck, not strain it. Keep your shoulders down and away from your ears. Repeat on the other side.
Shoulder Rolls To Improve shoulder Mobility
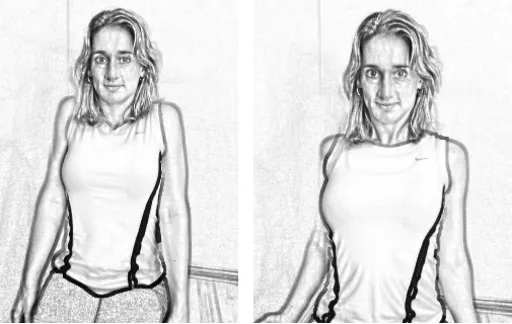
Figure 10‑4
To loosen your upper back and shoulder muscles, raise your shoulders to your ears and then roll them as far back as you can and as far down away from your ears as you can (Figure 10-4). Move them forward and back up to complete the circle. Slowly repeat this rotation five times.
Breathe in as you raise your shoulders, and breathe out as you roll them back and down. This allows you to combine stretching with a calming breath, which helps calm the mind (an important activity to do throughout a stressful work day). Remember, stress is the cause of all dis-ease that leads to disease. So find ways like this to relax, rejuvenate, and heal throughout the day.
Arms Over Head Stretch
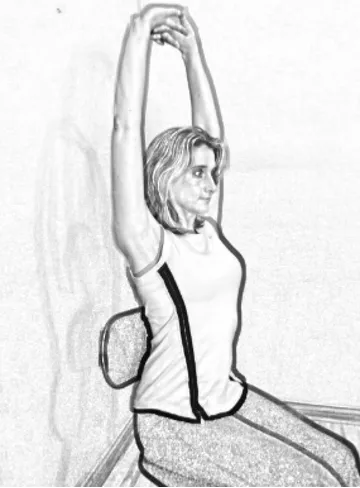
Figure 10‑5
When you stretch your arms over your head, you work the muscles in your back and shoulders. To do this stretch, interlace your fingers and stretch your arms straight up over your head with your palms turned up (Figure 10-5). Keep your shoulders away from your ears and your elbows straight. Hold your arms above your head and breathe five slow breaths.
If you do this stretch while standing, be careful not to hyperextend your lower back by sticking your buttocks out too far. Keep space in your low back as you lift your arms up and back.
External Shoulder Rotation
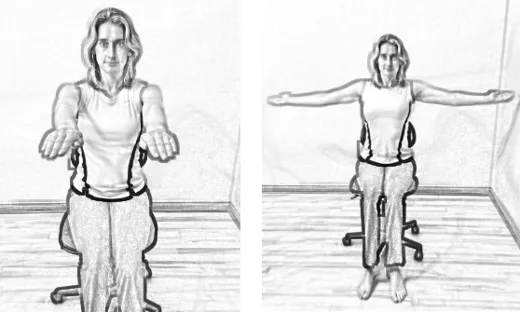
Figure 10‑6
To do the external shoulder rotation, stretch your arms out in front of you, palms down (Figure 10-6). Then extend your arms to the sides, moving horizontally, while rotating your palms upward. Be sure to engage the muscles between your shoulder blades as you bring your arms out.
Reverse the movement, slowly bringing your arms forward and rotating your palms down. Repeat the stretch a few times. This warms up the shoulders and works on external rotation (a movement we don’t do naturally while working at a computer).
Arm Raise
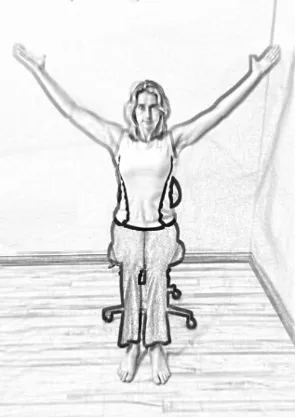
Figure 10‑7
When you sit (often hunched over) at your computer for hours, your arms and palm down the whole time unless you mindfully do a stretch like this. To do the arm raise, bring your arms up, palms up, to form a V, and squeeze your shoulders back and down (Figure 10-7). Slowly lower them back to your sides and repeat a few times. Do this stretch frequently to offset the effects of long-term keyboard use.
This stretch helps old blood and lymph drain out of the upper extremities. When you lower your arms, nutrient-filled blood replenishes them (helping you heal from conditions like carpal tunnel or tendonitis). I like to do this stretch at least once an hour while at a computer. It stretches your lateral side muscles (latissimus dorsi) and strengthens your rhomboid muscles.
Hands Behind Head Neck Traction To Improve Neck Mobility
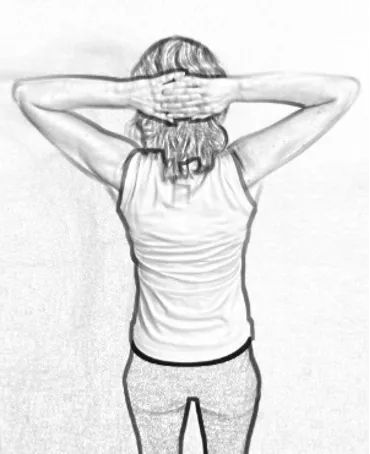
Figure 10‑8
All day long, your arms are down in front of you. This stretch involves doing the opposite of what you do all day. Interlace your fingers behind your head (Figure 10-8). Tuck your chin in, press your head back into your hands, and squeeze your shoulder blades together. Hold this for five breaths. This stretch stretches the back of your neck and the front of your chest while strengthening the mid-back muscles.
This stretch can be done while seated or standing. If you are standing, be careful not to arch your back too much into extension (you want the mid-back to arch, not the lower back to compress).
Pectoral Stretch
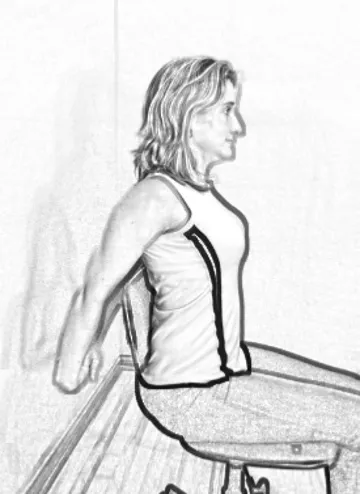
Figure 10‑9
The pectorals are the muscles in the upper chest. To stretch these muscles, place your hands behind your back and interlace your fingers (Figure 10-9). Straighten your elbows and lift your hands away from your buttocks (squeezing your shoulder blades together). In addition to stretching your pectorals, this exercise strengthens your rhomboids in the middle of your back. It also increases extension throughout your mid-back.
If you are doing this stretch while seated and your chair back is low enough, arch your back over the chair back as you squeeze your shoulder blades together. Hold for five, deep slow breaths.
You may feel or hear a few pops in your mid-back with this stretch, which is a good thing! It means your body is self-adjusting. If the relief from this self-adjustment lasts less than an hour, you still have a restricted joint in that area that didn’t pop. If you feel this tension and lack of relief, I would advise seeing a chiropractor to get the restricted joints professionally released.
A Standing Version of the Pectoral Stretch
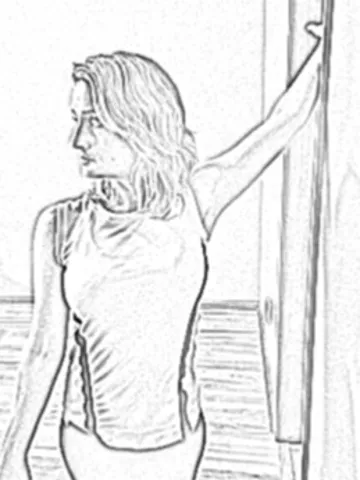
Figure 10‑10
In this variation of the pectoral stretch, you stretch the pectoral muscles by standing in a doorway, placing your left palm against the doorframe with your arm at a 45-degree angle upward, and leaning into the doorway to open up the left chest (Figure 10-10). To add a stretch to your anterior neck muscles, turn your head to the right (away from the raised arm). Repeat on the other side.
This is a great stretch to relieve shoulder pain, pain down the arm, swelling of the arm and hands, and upper back pain.
Standing-in-Doorway Shoulder Stretches
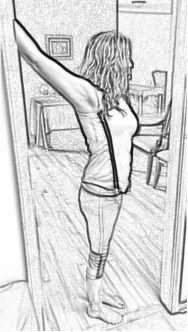
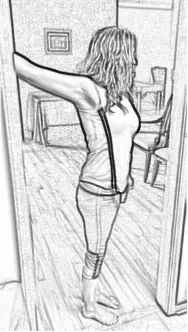
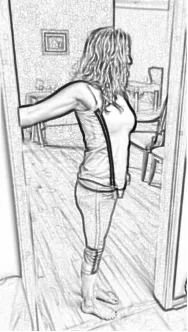
Figure 10‑11: Pectoral stretch with arms at various heights to stretch different muscle fibers in the anterior shoulder and chest.
You can loosen up the muscles surrounding the shoulders further by doing the doorway stretch with your arm at a steeper angle above and below your shoulder (Figure 10-11). Varying the angle of the stretch allows you to stretch the various muscles of the anterior shoulder. It is a good way to warm up for the next stretch of the lateral chest muscles.
Wall Arm Stretch
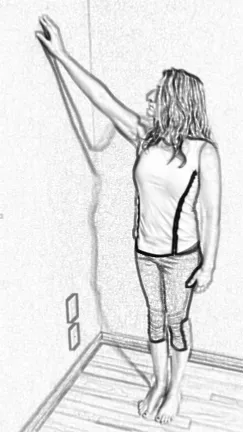
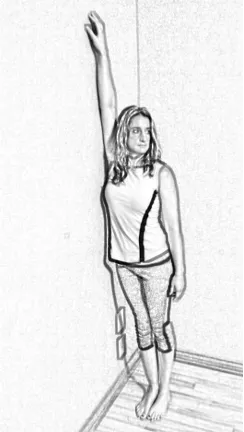
Figure 10‑12: Shoulder stretch walking hands up the wall and then leaning into the wall to deepen the stretch.
Shoulders tend to tighten and lose their flexibility in abduction, limiting the range of motion of raising your arm above the horizon. A stiff shoulder leads to a stiff neck. Combat this by periodically raising your arms high above your head.
If you have difficulty raising your arms, walk your hand up a wall (Figure 10-12). Then lean into your arm against the wall to assist the stretch. Be careful not to hurt your shoulder. If you feel a stretch, you are improving your range of motion. If you feel a strain, you are harming your shoulder.
Arm-Across-Body Stretch
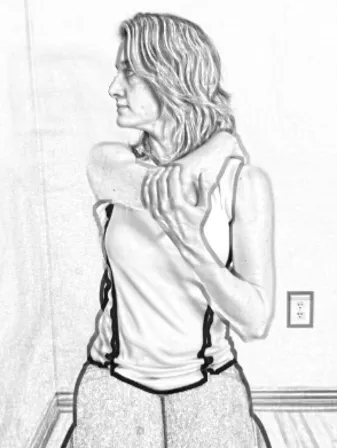
Figure 10‑13
This stretch works the posterior shoulder muscles. Begin by pulling your right arm across your body with your left hand just above the right elbow (Figure 10-13). Rest your right hand behind your left shoulder. The farther you bring the right elbow toward your left shoulder, the deeper the stretch in your shoulder. You may even feel the upper back muscles stretching, which is good as long as you don’t stretch to the point of pain and strain.
The shoulder is a very complicated joint with multiple small muscles that work together to move the shoulder in many different directions. Feel free to explore different angles of stretches by raising and lowering the elbow as you bring it across; this stretches different groups of muscles in the back of the shoulder and back.
You can add to this stretch by pressing your right elbow into your left hand, causing an isometric contraction of the muscles in the back of your upper right arm. Hold this contraction for three slow breaths, then relax your right arm and use your left hand to bring your right arm deeper into the stretch cautiously (do not pull too hard because you can overstretch the muscles). Repeat this up to three times. After releasing, rotate your shoulders a few times to help fully release the stretch. Then repeat on the other side.
Triceps and Lateral Body Stretch
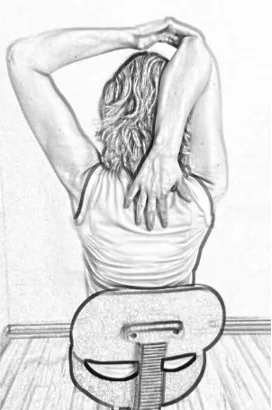
Figure 10‑14
This stretch works the muscles in the back of your arm and those down the side of your torso. To perform the stretch, lift your right arm up, then bend your elbow so your right hand is dangling behind your head (Figure 10-14). Use your left hand to gently pull your right elbow even farther behind your head. Hold for three breaths. Do not overstretch. If you feel a painful strain, then you are literally straining your muscles and/or spraining your shoulder, potentially causing damage. Repeat on the other side.
This stretch is best done while standing, but it can be done in a seated position.
Cow Face Pose (a Deeper Triceps Stretch)
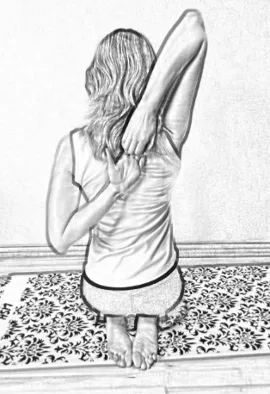
Figure 10‑15
The cow face pose (also known as Apley’s stretch) is another stretch that is easily done throughout the day. The stretch requires you to reach for your hands behind your back, which helps improve both your posture and the flexibility of the mid-back.
Reach your left hand up and over your left shoulder while reaching your right hand behind your back from below. Try to grab your right hand with your left hand (Figure 10-15). Hold your position for a few breaths and then switch your arm positions.
If you can’t reach your fingers, modify the stretch using a towel or strap (Figure 10-16). If you use a strap, be careful that you don’t overstretch. Listen to the limitations of your body.
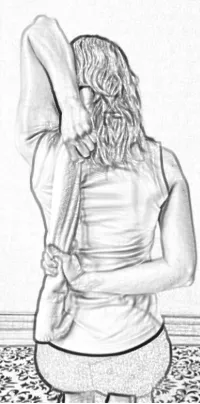
Figure 10‑16: Modified cow face pose with strap.
You can watch my YouTube video for a more detailed explanation of how to go from a modified cow face pose to the full pose using the post-isometric technique on my YouTube Channel:
www.youtube.com/channel/UC0dGeIPJ00LOLFIiXHAst8Q
YOU DON'T NEED TO BE IN PAIN!
SCHEDULE A CONSULT WITH US TODAY.
We can help! Why Wait?
to schedule with us today!
EXERCISES THAT HELP WITH NECK PAIN
AGAIN, MOST NECK PAIN involves tight neck muscles in the back of the neck (the posterior muscles), weak muscles between the shoulder blades (the rhomboids), and tight pectoral muscles (the muscles in the chest). This chapter shows you how to strengthen those weak rhomboids and posterior neck muscles |
Isometric Exercises for the Neck
Many of these exercises use isometric contraction; that is, you contract your muscles without allowing movement. Think about pushing a car. Your arm muscles contract as you push the car, but your muscles aren’t actually moving. The strain you feel in your muscles are isometric contractions. You want to try to achieve the same feeling when you do isometric exercises for your neck.
These neck exercises can be done while you are seated or standing. I suggest you stand if you can to increase blood flow and oxygenate your system.
Isometric Contraction in Flexion To Improve the strength of Neck muscles
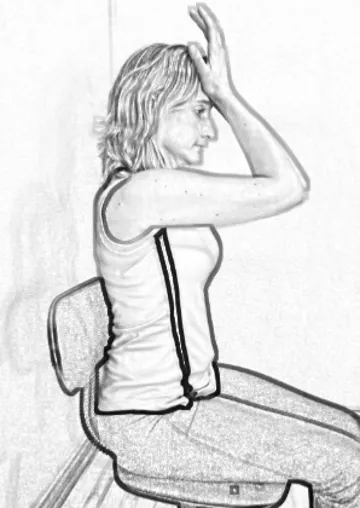
Figure 11‑1
To do an isometric contraction for the muscles in the front of your neck (the anterior muscles), put your hands on your forehead (Figure 11-1). Press into your hands with your anterior neck muscles, but stop your head from moving with your hands. Hold for three breaths. This strengthens the anterior neck muscles.
Isometric Contraction in Rotation To Improve The Strength Of Neck Muscles

Figure 11‑2
To do an isometric contraction for the muscles at the sides of your neck, put your right hand at the right side of your forehead (Figure 11-2). Press into it by trying to turn your head to the right, but use your hand to prevent the rotation. This exercises the rotation muscles in your neck. Hold for three breaths. Repeat on the left side.
Isometric Contraction in Lateral Flexion To Improve The Strength Of Neck Muscles
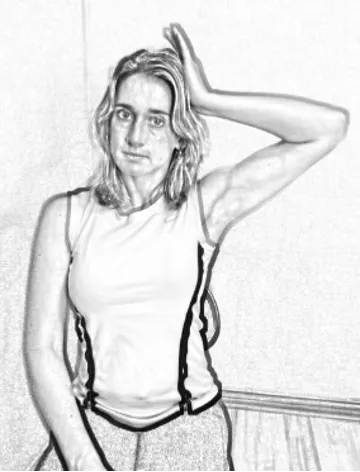
Figure 11‑3
Put your hand to the right side of your head (Figure 11-3). Press into it by laterally flexing your head to the right, but prevent your head from moving by applying pressure with your hand. This exercises the lateral flexion muscles in your neck. Hold for three breaths. Repeat on the left side.
Post-Isometric Contractions for the Neck To Improve The Strength Of Neck Muscles
Post-isometric stretching involves bringing a muscle to a stretched position, then contracting the muscle at 30 to 50 percent of its strength without allowing it to move for three to five slow breaths. On the last exhale, you relax the muscle, allowing it to lengthen farther, deepening the stretch. When you contract opposing muscle groups, you fool them into thinking they are in a contracted (shortened) state, so when they relax, they elongate, allowing for a deeper stretch. You can repeat this up to three times.
Unlike the isometric contractions on the previous pages, in the following exercises you stretch one set of neck muscles and then contract the opposing muscle group without allowing the muscles to move by placing a hand against your head.
Post-isometric stretches can be performed with any muscle to increase flexibility. Football players often stretch their hamstrings using isometric contractions.
Post-Isometric Contraction in Rotation To Improve The Strength Of Neck Muscles
To stretch the neck in rotation with a post-isometric contraction, turn your head as far to the left as is comfortable (Figure 11-4).
Figure 11‑4: Turning the head to the left.
You (or your practitioner) place a hand on your right temporal region to provide resistance as you press into the hand as if you are trying to turn your head to the right (Figure 11-5).
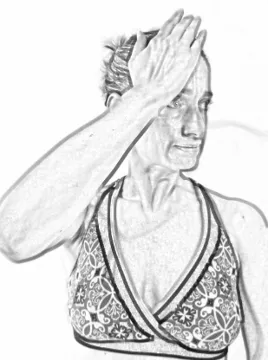
Figure 11‑5: Isometric contraction to the right (providing resistance with the right hand).
Hold this contracted isometric state for three to five deep, slow breaths. You (or your practitioner) should not push your head to the left because this can strain the muscles. On the last exhale, relax, allowing your head to turn farther to the left (Figure 11-6).
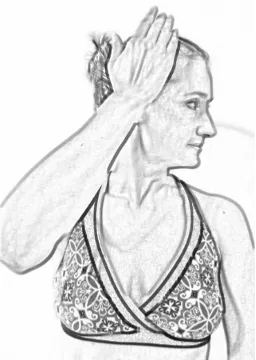
Figure 11‑6: Turning the head farther to the left without pressing with the right hand.
When you’ve reached your comfortable limit in left rotation, you (or your practitioner) provide resistance as you turn your head to the right again and as you (or they) resist by pressing to the left (Figure 11-7).
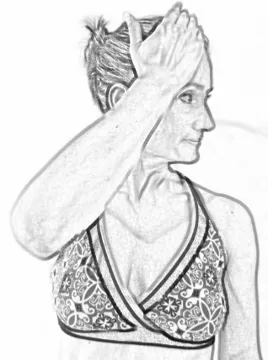
Figure 11‑7: Pressing into the hand to the right a second time.
Again, this is an isometric contraction, so your head shouldn’t turn at all. Just try to turn your head to the right as you (or your practitioner) hold your head still. Hold for three to five breaths and then relax. If you can turn farther to the left, do so, repeating the isometric contraction to the right again.
Repeat up to three times in one direction. Then repeat, turning your head to the right, with isometrics to the left.
Post-Isometric Contraction in Lateral Flexion To Improve The Strength Of Neck Muscles
Post-isometric stretching can be used for lateral flexion as well. First, tilt you head as far as you can to the right (Figure 11-8).
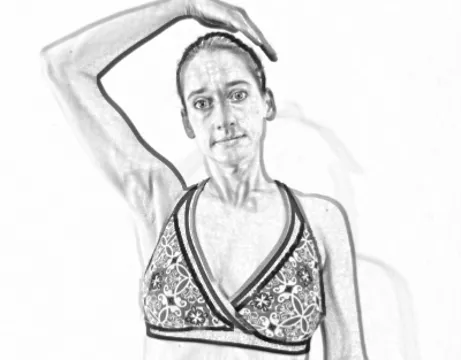
Figure 11‑8: Tilting the head to the right.
Then place your right hand on the left side of the top of your head and press your head into your hand (Figure 11-9), contracting the muscles that would tilt your head to the left).
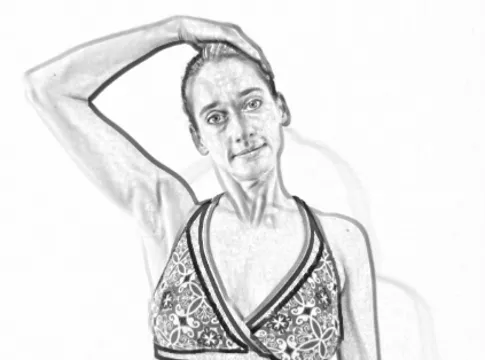
Figure 11‑9: Isometric contraction of the neck to the left.
Hold the contraction for three breaths. On the third exhale, relax and see if your head will fall into a deeper tilt to the right (Figure 11-10).
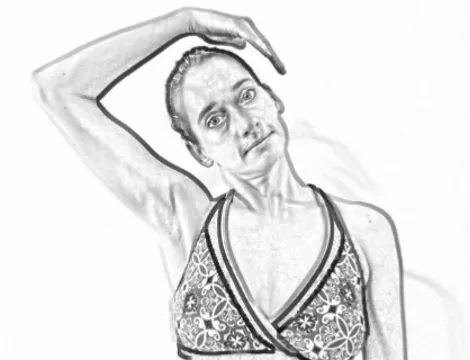
Figure 11‑10: Going deeper into the stretch.
If you can’t go deeper, just press into the right hand again. If your head tilted farther to the right, bring your right hand to the left side of the head again and press into it (Figure 11-11).
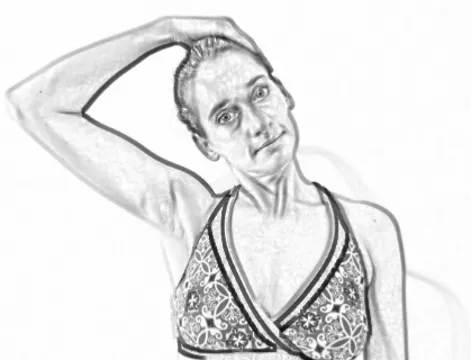
Figure 11‑11: A deeper isometric contraction to the left.
Again, hold for three breaths and relax on the final exhale. Repeat this up to three times.
Then repeat on the other side.
You can do post-isometric stretches throughout the day. To learn how, visit my YouTube channel and watch:
https://www.youtube.com/watch?v=PDcFpJuEoTg
Strong Posterior Neck Stretch To Improve The Strength Of Neck Muscles and their range of motion
This particular stretch isn’t necessarily good for everyone. Please confirm with your healthcare provider that this stretch is appropriate for you.

Figure 11‑12
To work the muscles in the front and the back of your neck at the same time, try this exercise. Turn your head about halfway toward your right shoulder. Place your left hand at the base of your skull with the base of your thumb where your skull rests on your spine. Tuck your chin in and press back with your head as you press forward and upward with your left hand (Figure 11-12).
This combination forms a strong traction for the muscles in the back of your neck on the left and strengthens the muscles in the front of your neck on the right.
Repeat on the other side.
Rhomboid Strengthening Exercise
Rhomboids are the muscles between your shoulder blades. You can strengthen them by simply squeezing your shoulder blades back and down as if you’re bringing the bottom of your shoulder blades together (Figure 11-13). Hold this position for a couple of breaths. Remember to keep your shoulders back and down as you do this exercise. It is more important to do this exercise frequently throughout the day instead of focusing on the number of times you do it in a row. Try doing this stretch every twenty minutes.
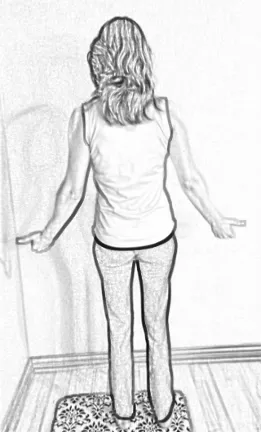
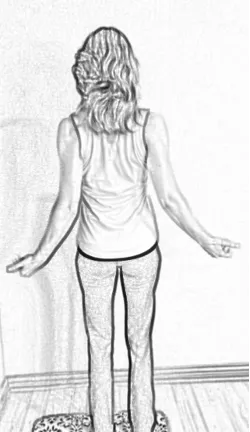
Figure 11‑13: Strengthen the rhomboids by squeezing the shoulder blades back and down.
If your pectoral muscles (the muscles in your chest) are tight and/or overdeveloped, they will pull your shoulders forward and cause you to slouch, which can lead to neck pain. Doing this rhomboid strengthening exercise will not only strengthen these opposing back muscles, but it will also stretch out your tight pectoral muscles and make it easier for you to stand up straight.
Be careful not to engage your upper back muscles (the trapezius muscles). They tend to be overdeveloped and want to assist your weaker rhomboid muscles (Figure 11-14). This imbalance can result in neck pain. It can also lead to radiation of pain down the arms.
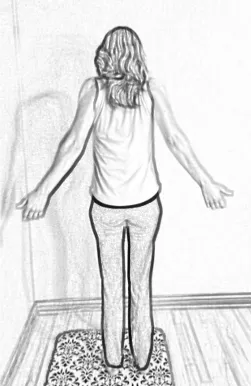
Figure 11‑14: Incorrect shoulder squeeze (above) versus proper shoulder squeeze (below).

Rhomboid Pull
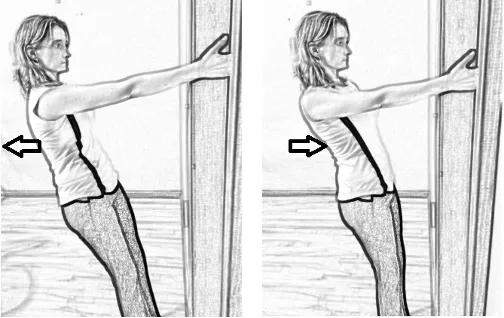
Figure 11‑15
Grab onto a doorframe with one hand and lean back (keep your shoulders down, away from your ears). Then pull your weight up by squeezing your shoulders back and down by contracting your rhomboids (Figure 11-15). Be careful not to pull yourself up with your arm muscles — that’s cheating! Then relax, allowing your body to lean back. Repeat ten times.
Repeat on the opposite side.
Shoulder Squeeze
If you want to make the shoulder squeeze a heavy-duty workout, add an exercise band (Figure 11-16).
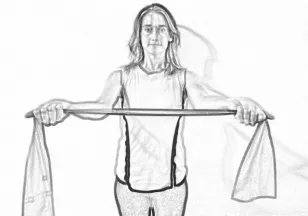

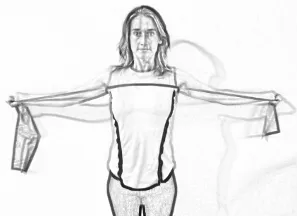
Figure 11‑16: Rhomboid strengthening with an exercise band.
I recommend doing this exercise with your palms up because it helps the shoulder blades maintain a better position. It also changes the orientation of your palms, which are usually facedown with regular daily activities. Remember, if you do too much of one thing, you should balance it out with the opposite action every once in a while.
YOU DON'T NEED TO BE IN PAIN!
SCHEDULE A CONSULT WITH US TODAY.
We can help! Why Wait?
to schedule with us today!
All of our chiropractors specialize in neck pain.
To learn more about how we treat here at Drummond Chiropractic, CLICK HERE.
To go back to our home page, CLICK HERE.